# Calliope mini Programmieren - Kurs

In unserer digital geprägten Welt ist es wichtiger denn je, Kindern schon früh den Zugang zur Welt der Technik und Programmierung zu ermöglichen. Der Umgang mit Computern, Apps und Robotern gehört heute ganz selbstverständlich zum Alltag – doch wie funktionieren diese eigentlich? In diesem Kurs entdecken Kinder spielerisch die Grundlagen des Codens mit dem Calliope Mini und dem Callibot-Roboter. Sie lernen, wie man mithilfe der grafischen Programmiersprache NEPO im Open Roberta Lab eigene Programme erstellt und Roboter zum Leben erweckt.

Programmieren fördert nicht nur das logische Denken, die Kreativität und das Problemlösevermögen, sondern stärkt auch das Selbstbewusstsein der Kinder, indem sie eigene Ideen umsetzen und sehen, wie sie mit wenigen Klicks echte Ergebnisse schaffen. Wer heute versteht, wie digitale Technik funktioniert, kann morgen selbst mitgestalten – ob in der Schule, im Beruf oder in der Freizeit.

Der Kurs wurde 2019 an der [Evangelischen Grundschule Berlin-Lichtenberg](https://www.ev-schule-lichtenberg.de/unsere-schule/) ins Leben gerufen und findet seither wöchentlich für 90 Minuten statt. Die Kursstruktur ist speziell darauf ausgelegt, in dieser begrenzten Zeit pro Einheit spürbare Lernerfolge zu erzielen. Jede Stunde endet mit einem kleinen, greifbaren Ergebnis – sei es ein blinkendes Lichterspiel, ein tanzender Roboter oder ein selbstprogrammierter Minispiel-Ablauf. So erleben die Kinder Programmieren nicht als trockene Theorie, sondern als etwas, das Spaß macht, motiviert und begeistert.

# Kurs - Vorbereitung

Dieses Kapitel gibt einen Überblick über alle Schritte, die vor Kursbeginn zu beachten sind. Ziel ist es, einen reibungslosen Ablauf sicherzustellen und eine Umgebung zu schaffen, in der die Kinder konzentriert und kreativ arbeiten können. Die folgenden Abschnitte erläutern die einzelnen Vorbereitungsschritte im Detail.

# Organisation

### Übersicht

### Materialen

<table border="1" id="bkmrk-kursplakat-calliope_" style="border-collapse: collapse; width: 100%; height: 58px;"><colgroup><col style="width: 23.452381%;"></col><col style="width: 35.47619%;"></col><col style="width: 41.071429%;"></col></colgroup><tbody><tr style="height: 29px;"><td style="height: 29px;">Kursplakat</td><td style="height: 29px;">[Calliope\_Kurs\_Plakat\_A2\_V02.00.pptx](https://calliope.codingkidz.de/wiki/attachments/93)

[Calliope\_Kurs\_Plakat\_A2\_V02.00.pdf](https://calliope.codingkidz.de/wiki/attachments/94)

</td><td style="height: 29px;">  
</td></tr><tr style="height: 29px;"><td style="height: 29px;">Coding Kidz </td><td style="height: 29px;">[codingkidz.de.png](https://calliope.codingkidz.de/wiki/attachments/96)

[codingkidz.de-Aufsteller-6.pdf](https://calliope.codingkidz.de/wiki/attachments/95)

[codingkidz.de-Aufsteller-16.pdf](https://calliope.codingkidz.de/wiki/attachments/97)

</td><td style="height: 29px;">  
</td></tr></tbody></table>

### Calliope mini / Calli:Bot

<table border="1" id="bkmrk-" style="border-collapse: collapse; width: 100%; height: 58px;"><colgroup><col style="width: 33.333333%;"></col><col style="width: 33.333333%;"></col><col style="width: 33.333333%;"></col></colgroup><tbody><tr style="height: 29px;"><td style="height: 29px;">  
</td><td style="height: 29px;">  
</td></tr><tr style="height: 29px;"><td style="height: 29px;">  
</td><td style="height: 29px;">  
</td></tr></tbody></table>

# Nutzer bei OpenRoberta anlegen

Damit die Schülerinnen und Schüler ihre Programmen abspeichern und wiederherstellen können, werden Nutzer-Accounts bei OpenRoberta benötigt. Diese sind vor dem zweiten Termin wie folgt anzulegen.

<table border="1" id="bkmrk-1.-anmeldung-bei-ope" style="border-collapse: collapse; width: 100%; height: 505px;"><colgroup><col style="width: 30.47619%;"></col><col style="width: 69.404762%;"></col></colgroup><tbody><tr style="height: 45px;"><td style="height: 45px;">Neuen Teilnehmenden anlegen

Muster:

Benutzername: evli-kurs-vorname

Passwort: evli-kurs

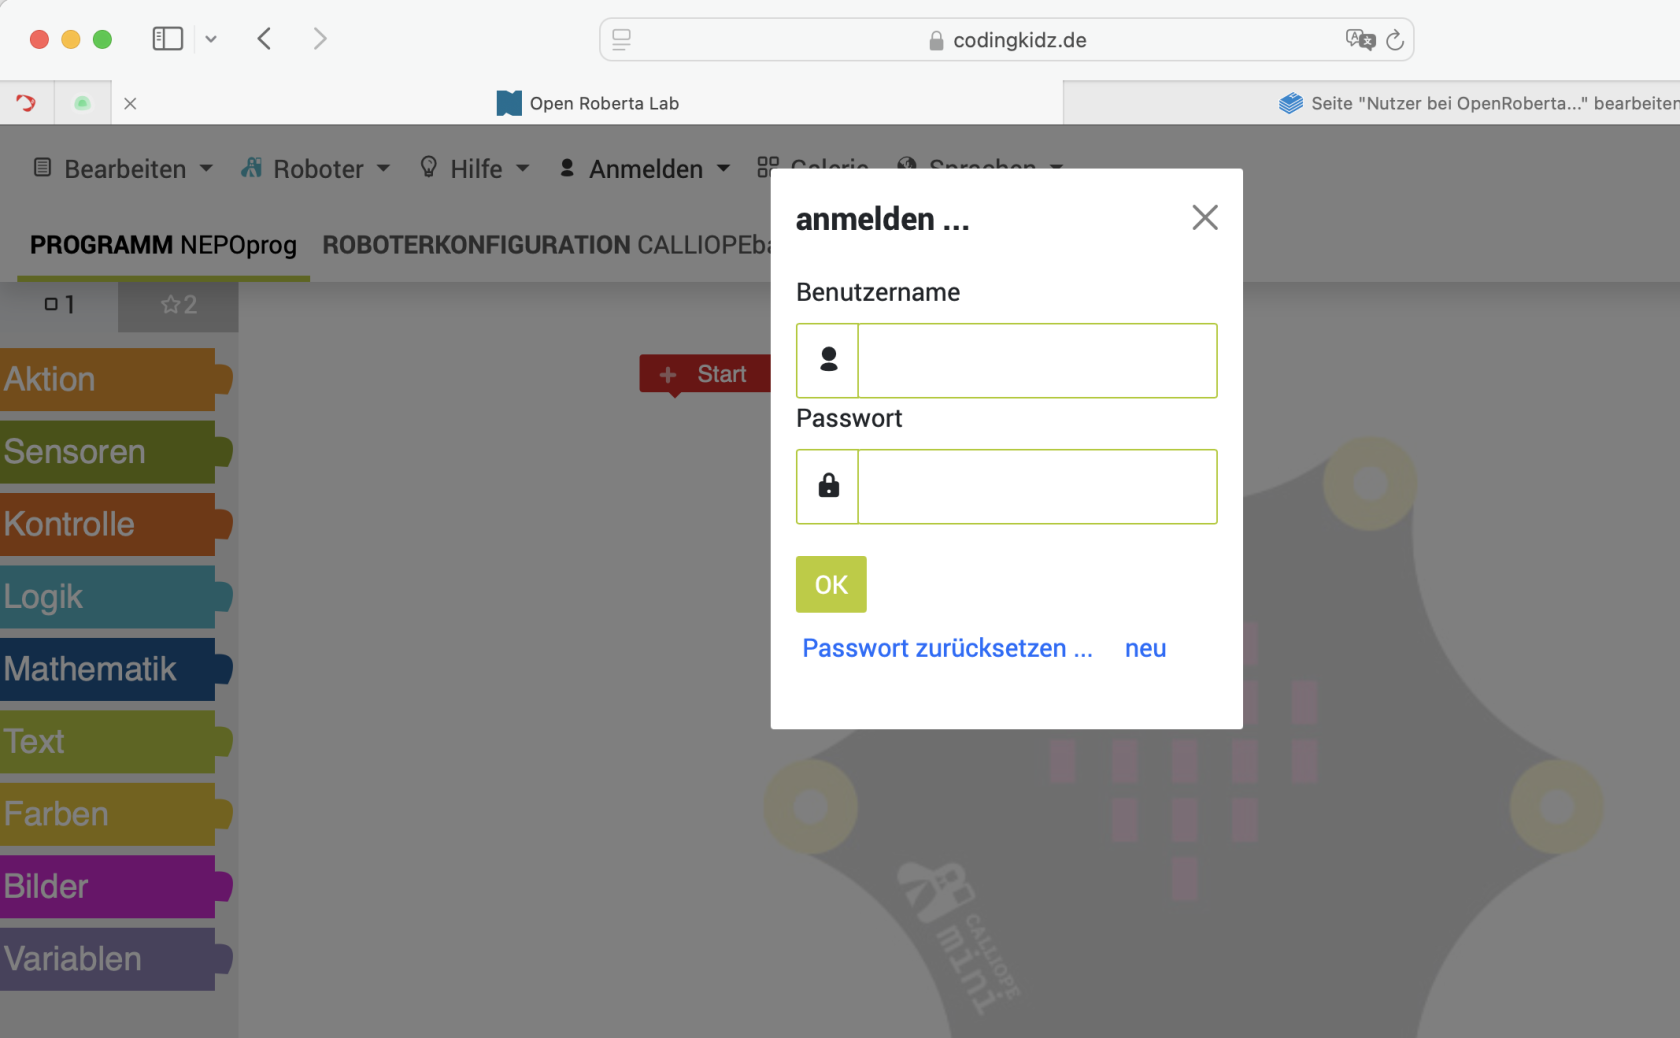
</td><td style="height: 45px;">Menu =&gt; Anmelden =&gt; anmelden

[![Bildschirmfoto 2024-11-17 um 11.33.46.png](https://calliope.codingkidz.de/wiki/uploads/images/gallery/2024-11/scaled-1680-/bildschirmfoto-2024-11-17-um-11-33-46.png)](https://calliope.codingkidz.de/wiki/uploads/images/gallery/2024-11/bildschirmfoto-2024-11-17-um-11-33-46.png)

Link "neu" anklicken

[![Bildschirmfoto 2024-11-17 um 11.34.51.png](https://calliope.codingkidz.de/wiki/uploads/images/gallery/2024-11/scaled-1680-/bildschirmfoto-2024-11-17-um-11-34-51.png)](https://calliope.codingkidz.de/wiki/uploads/images/gallery/2024-11/bildschirmfoto-2024-11-17-um-11-34-51.png)
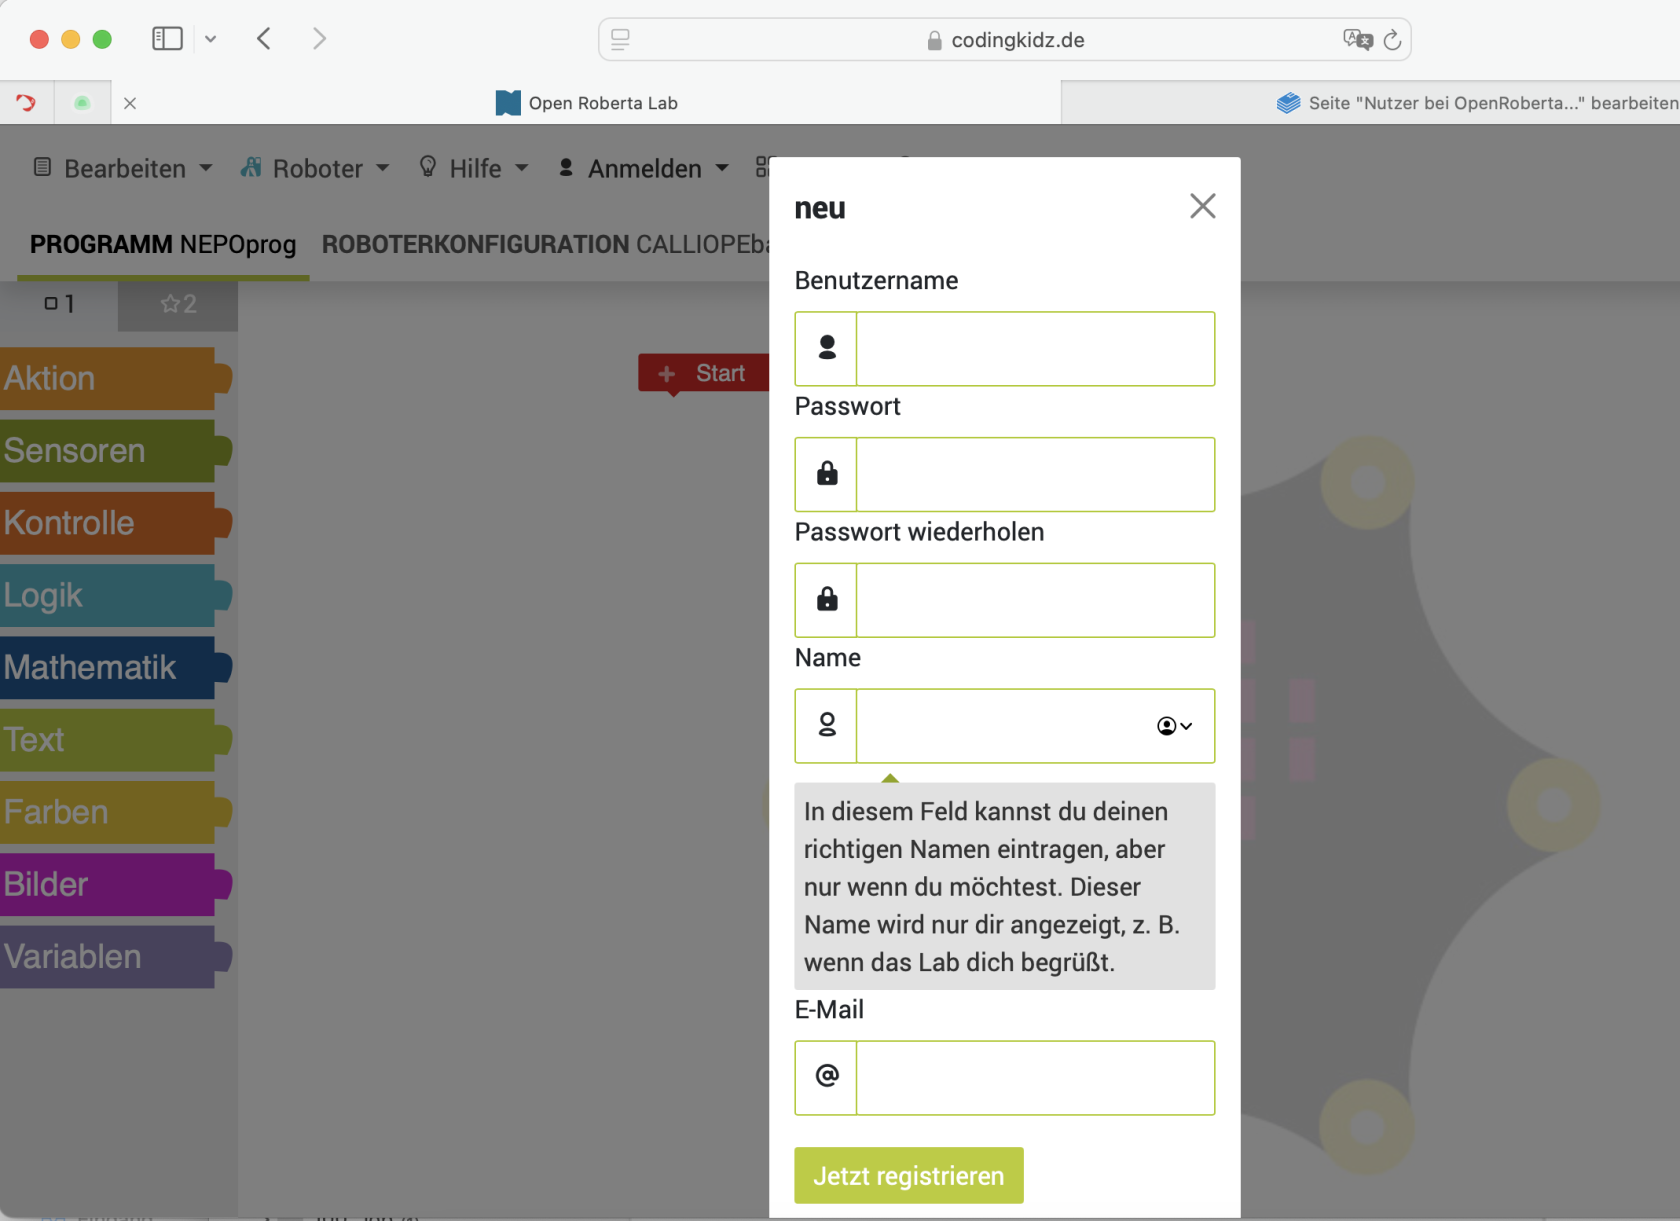
 Felder wie folgt ausfüllen:

- Benutzername: evli-kurs-vorname (bspw. evli-kurs-christian)
- Passwort: evli-kurs
- Passwort wiederholen: evli-kurs
- Name: Vorname des Teilnehmenden (bspw. Christian)
- E-Mail: nicht befüllen

</td></tr></tbody></table>

# Calliopes initialisieren

## Calliope

<table border="1" id="bkmrk-check-01%C2%A0-led-matrix" style="border-collapse: collapse; width: 100%;"><colgroup><col style="width: 50%;"></col><col style="width: 50%;"></col></colgroup><tbody><tr><td>Check 01

- LED Matrix
- RGB LED
- Töne

</td><td>[NEPOprog\_Calliope\_Check01.xml](https://calliope.codingkidz.de/wiki/attachments/16)

[NEPOprog\_Calliope\_Check01.hex](https://calliope.codingkidz.de/wiki/attachments/17)

</td></tr><tr><td>Check 02

</td><td>  
</td></tr></tbody></table>

## Calli:Bot

<table border="1" id="bkmrk-" style="border-collapse: collapse; width: 100%;"><colgroup><col style="width: 50%;"></col><col style="width: 50%;"></col></colgroup><tbody><tr><td>  
</td><td>  
</td></tr><tr><td>  
</td><td>  
</td></tr></tbody></table>

# Kurs - Inhalte

In diesem Kapitel werden die zentralen Inhalte des Coding-Kurses vorgestellt. Die einzelnen Einheiten sind so gestaltet, dass sie altersgerecht, anschaulich und praxisnah grundlegende Programmierkonzepte vermitteln. Dabei stehen kreative Anwendungen, sichtbare Ergebnisse und der Spaß am Experimentieren mit dem Calliope Mini und dem Callibot im Vordergrund.

# Grundlagen

## am Computer anmelden

<table border="1" id="bkmrk-1-anmeldung-am-rechn" style="border-collapse: collapse; width: 100%; height: 115px;"><colgroup><col style="width: 5.679012%;"></col><col style="width: 24.814815%;"></col><col style="width: 69.382716%;"></col></colgroup><tbody><tr style="height: 57px;"><td style="height: 57px;">1</td><td style="height: 57px;">Anmeldung am Rechner</td><td style="height: 57px;">Name: Vorname.Nachname@evli.schule

Passwort: Euer geheimes Passwort

</td></tr><tr><td>  
</td><td></td><td>  
</td></tr></tbody></table>

## Programmierumgebung aufrufen

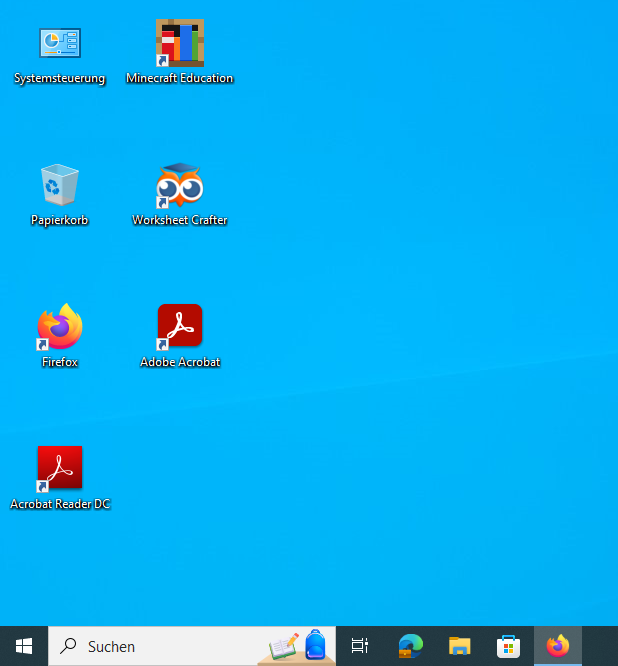
<table border="1" id="bkmrk-2-%C3%96ffnen-des-firefox" style="border-collapse: collapse; width: 100%; height: 115px;"><colgroup><col style="width: 5.679012%;"></col><col style="width: 24.814815%;"></col><col style="width: 69.382716%;"></col></colgroup><tbody><tr style="height: 29px;"><td style="height: 29px;">2</td><td style="height: 29px;">Öffnen des Firefox</td><td style="height: 29px;">[![grafik.png](https://calliope.codingkidz.de/wiki/uploads/images/gallery/2024-03/scaled-1680-/grafik.png)](https://calliope.codingkidz.de/wiki/uploads/images/gallery/2024-03/grafik.png)

</td></tr><tr style="height: 29px;"><td style="height: 29px;">3</td><td style="height: 29px;">Eingabe der Adresse

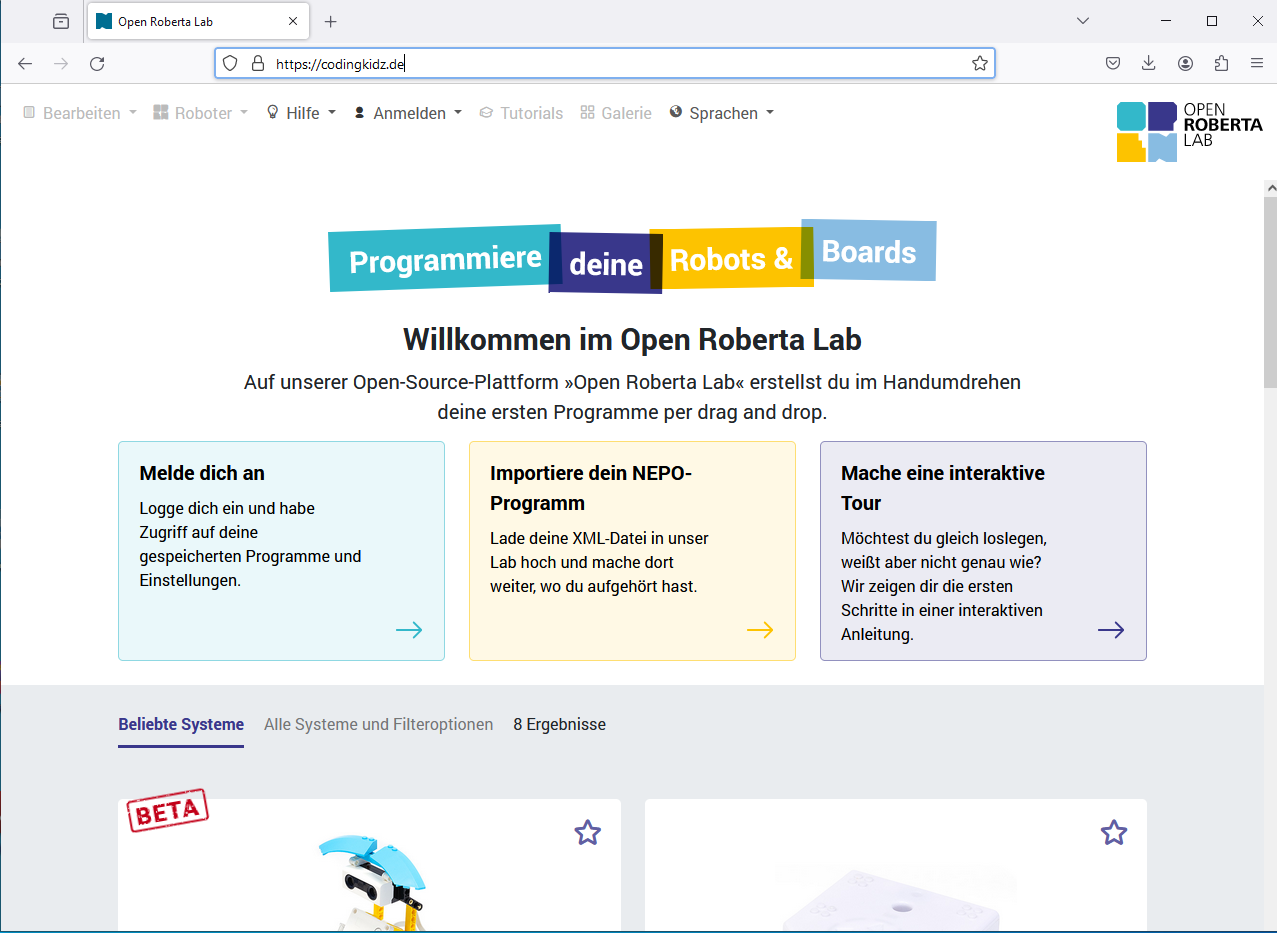
[https://codingkidz.de](https://codingkidz.de)

</td><td style="height: 29px;">[![grafik.png](https://calliope.codingkidz.de/wiki/uploads/images/gallery/2024-03/scaled-1680-/icdgrafik.png)](https://calliope.codingkidz.de/wiki/uploads/images/gallery/2024-03/icdgrafik.png)

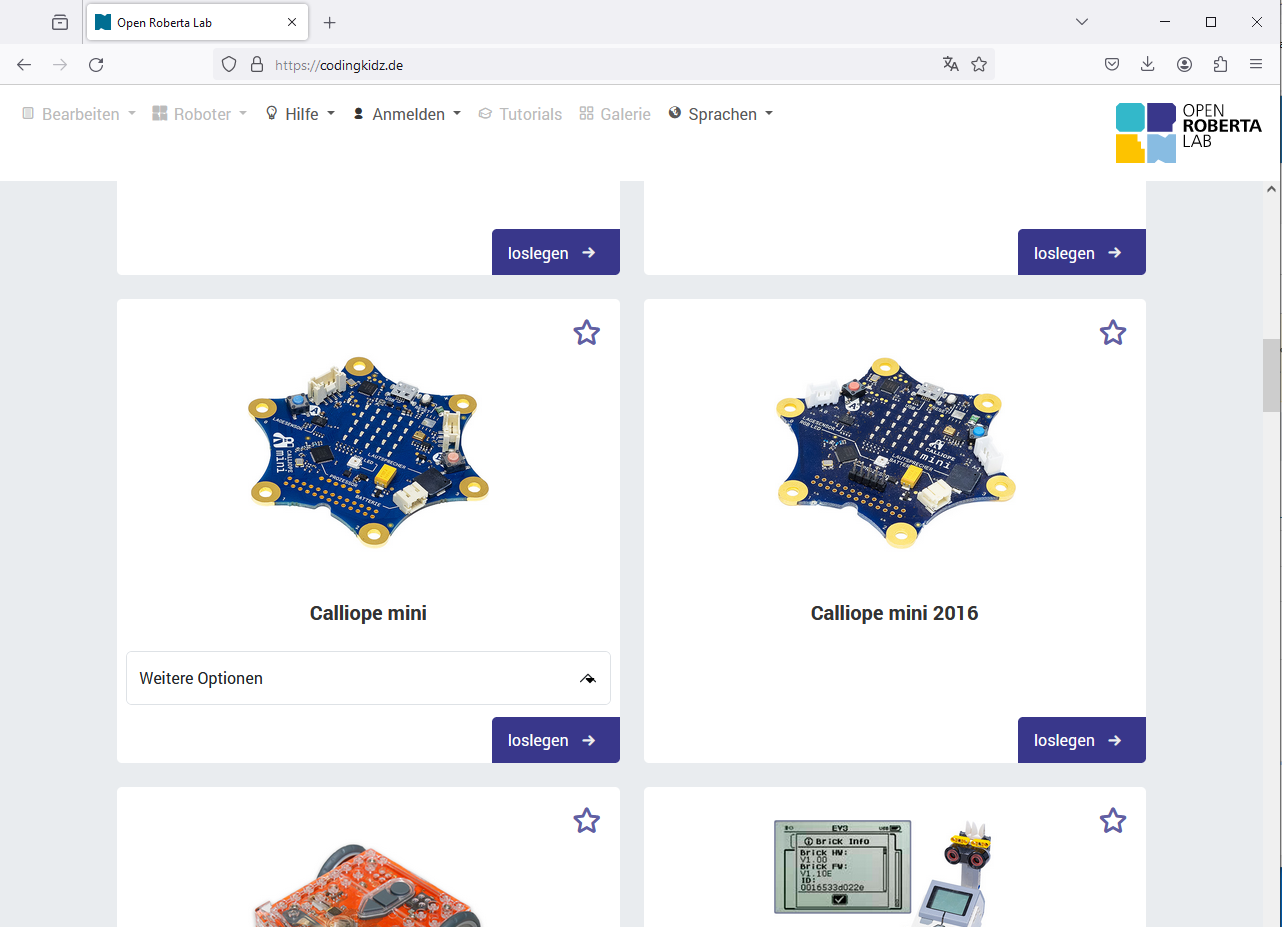
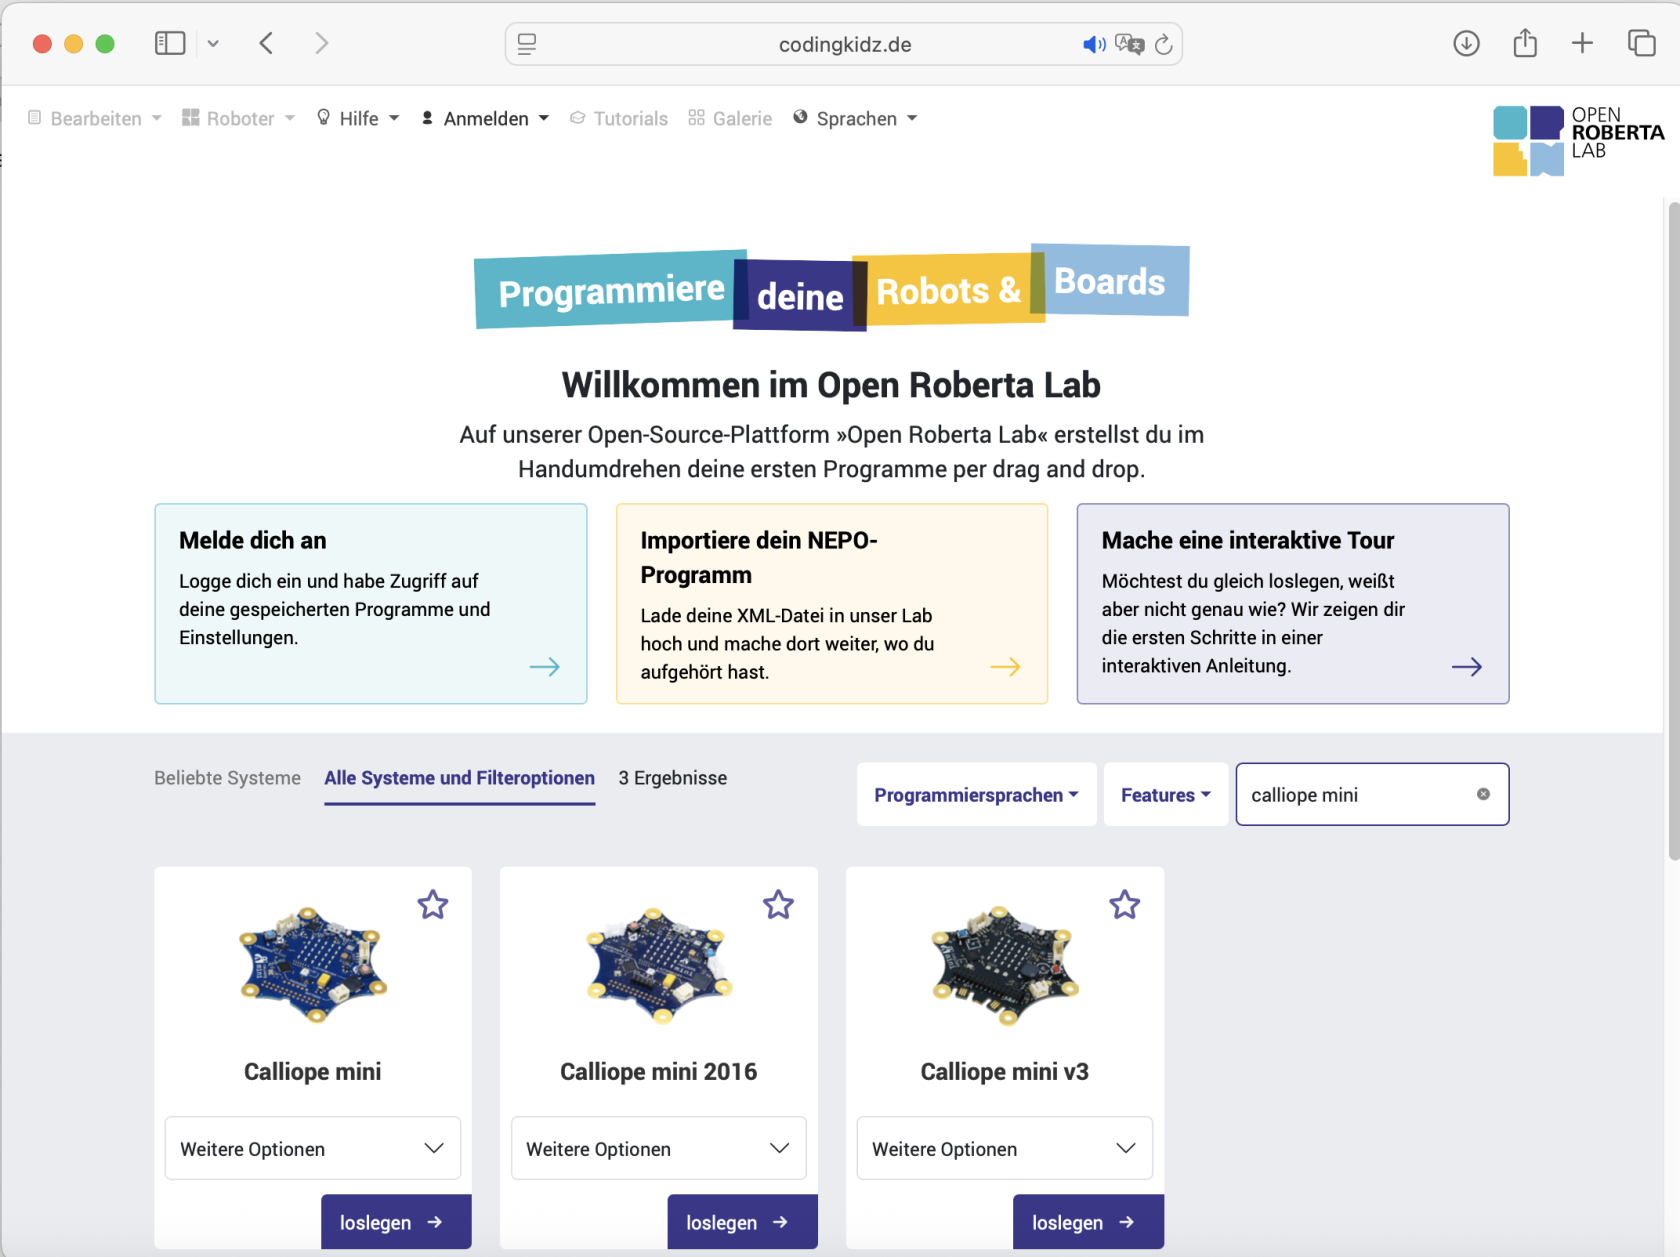
</td></tr><tr><td>4</td><td>Calliope mini auswählen

</td><td>[![grafik.png](https://calliope.codingkidz.de/wiki/uploads/images/gallery/2024-03/scaled-1680-/lVzgrafik.png)](https://calliope.codingkidz.de/wiki/uploads/images/gallery/2024-03/lVzgrafik.png)

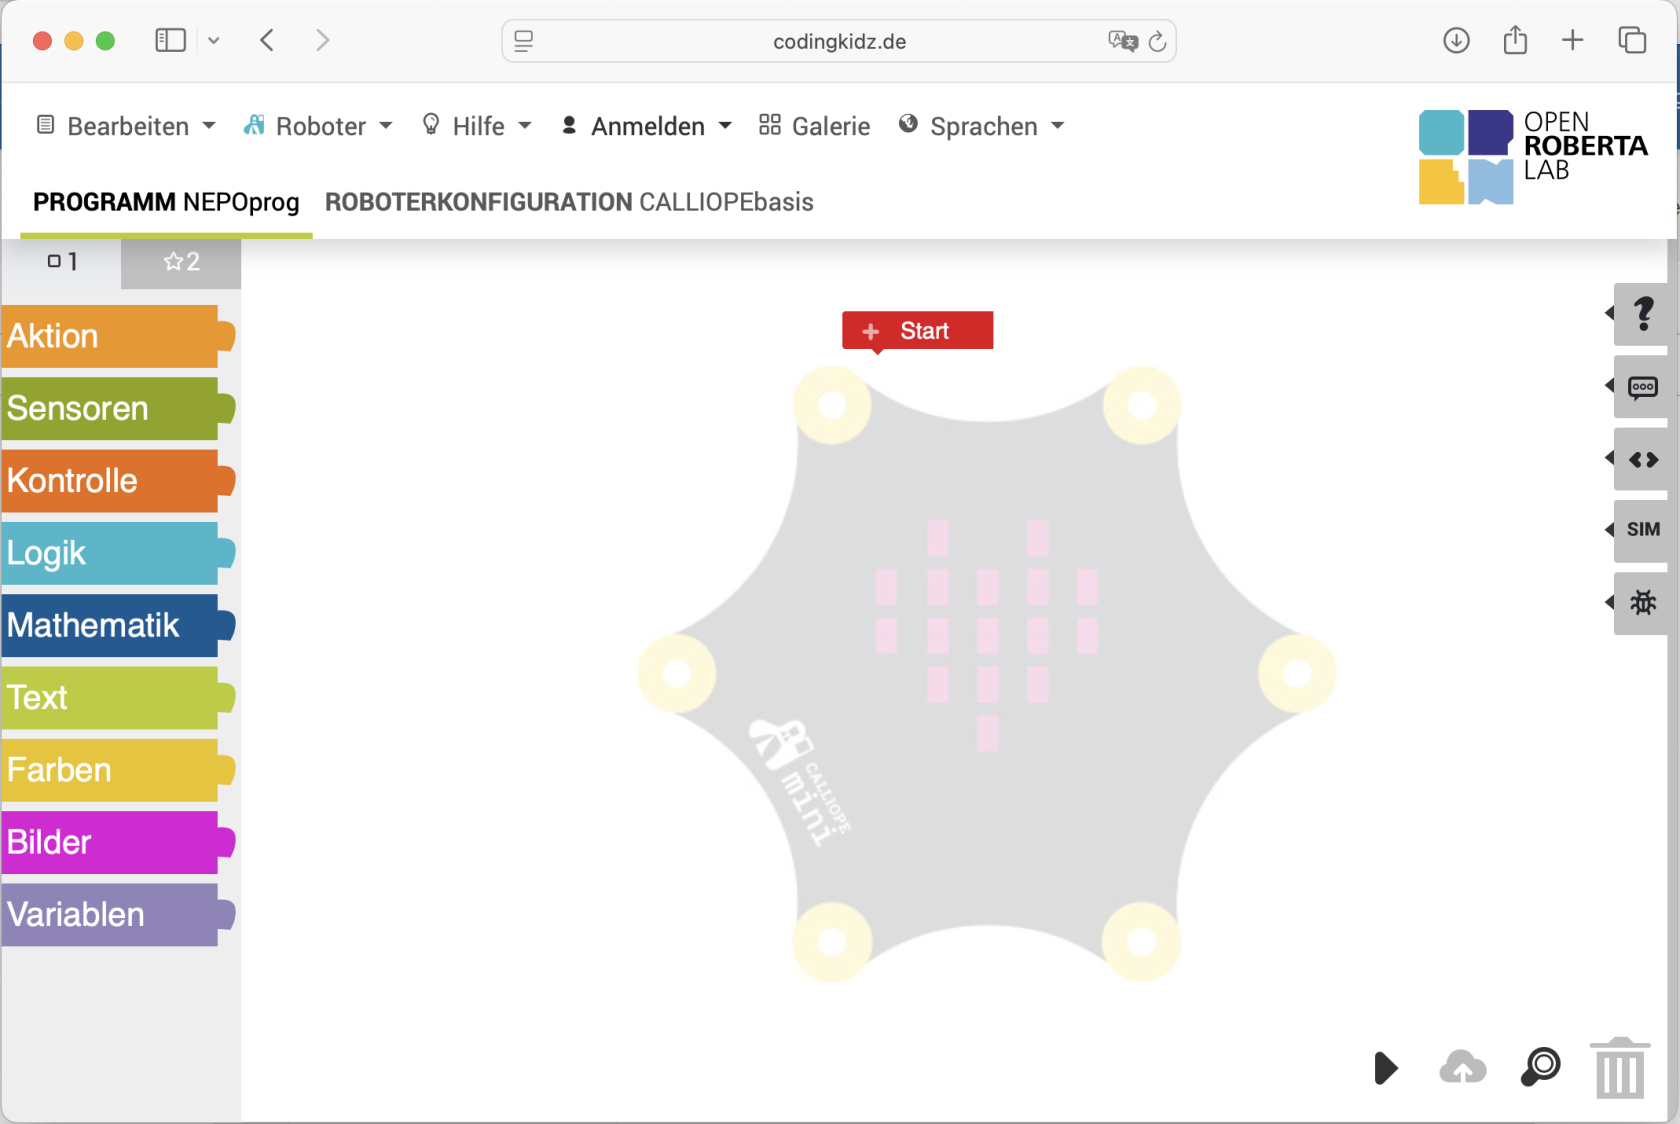
</td></tr><tr><td>5</td><td>Open Roberta Programmierumgebung nutzen

</td><td>[![Bildschirmfoto 2025-06-02 um 07.05.56.png](https://calliope.codingkidz.de/wiki/uploads/images/gallery/2025-06/scaled-1680-/bildschirmfoto-2025-06-02-um-07-05-56.png)](https://calliope.codingkidz.de/wiki/uploads/images/gallery/2025-06/bildschirmfoto-2025-06-02-um-07-05-56.png)

</td></tr></tbody></table>

## Programm auf Calliope überspielen

<table border="1" id="bkmrk-1-%C2%A0-%C2%A0-2-%C2%A0-%C2%A0-3-%C2%A0-%C2%A0" style="border-collapse: collapse; width: 100%; height: 115px;"><colgroup><col style="width: 5.679012%;"></col><col style="width: 24.814815%;"></col><col style="width: 69.382716%;"></col></colgroup><tbody><tr><td>1</td><td>Calliope mini mit dem Computer über das USB Kabel verbinden

</td><td>1.1 kleinen Stecker des USB-Kabels am Calliope einstecken  
1.2 großen Stecker des USB-Kabels am Calliope einstecken

<p class="callout danger">Achtung: die Stecker des USB-Kabels passen nur in einer Richtung. Sollten die Stecker nicht passen, dann dreht diese einfach um und versucht es nochmal. Sollte es gar nicht klappen wollen, dann holt Euch Hilfe beim Euren Mitschülern oder bei den Kursleitern.</p>

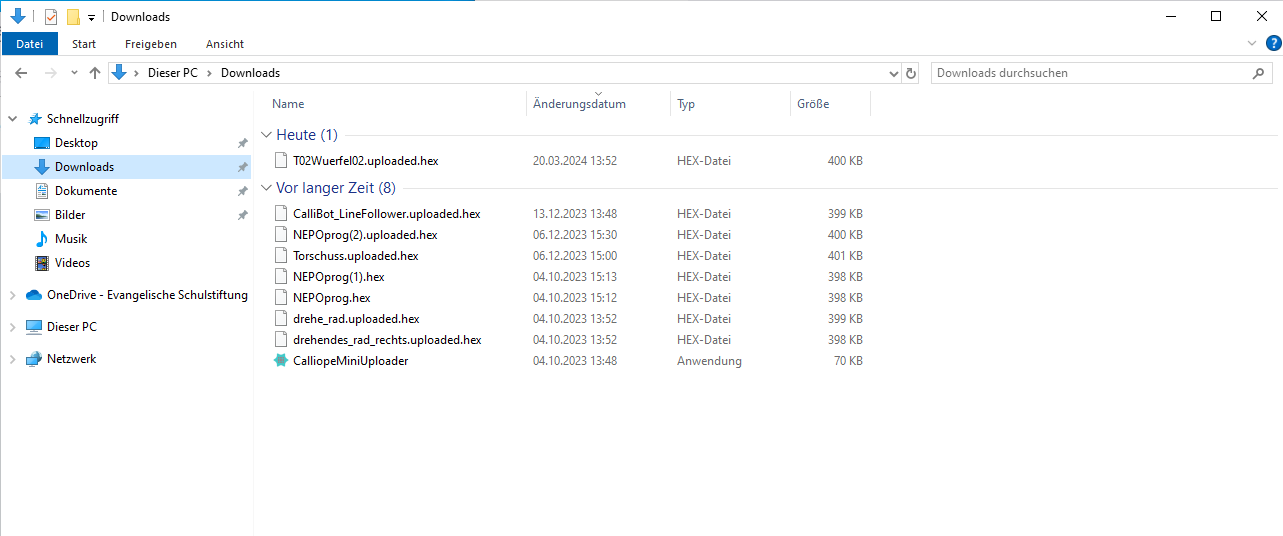
</td></tr><tr style="height: 29px;"><td style="height: 29px;">2</td><td style="height: 29px;">in Dateiexplorer wechseln und Downloads-Verzeichnis öffnen

</td><td style="height: 29px;">[![grafik.png](https://calliope.codingkidz.de/wiki/uploads/images/gallery/2024-03/scaled-1680-/rXNgrafik.png)](https://calliope.codingkidz.de/wiki/uploads/images/gallery/2024-03/rXNgrafik.png)

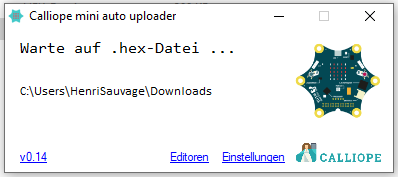
</td></tr><tr style="height: 29px;"><td style="height: 29px;">3</td><td style="height: 29px;">Programm **CalliopeMiniUploader** starten

</td><td style="height: 29px;">[![grafik.png](https://calliope.codingkidz.de/wiki/uploads/images/gallery/2024-03/scaled-1680-/YjVgrafik.png)](https://calliope.codingkidz.de/wiki/uploads/images/gallery/2024-03/YjVgrafik.png)

[https://docs.calliope.cc/tech/tools/autouploader/](https://docs.calliope.cc/tech/tools/autouploader/)

</td></tr><tr><td>4</td><td>zurück in Firefox wechseln und "Play" Knopf drücken

</td><td>4.1 "Play" Knopf drücken

4.2 alles Bestätigen

<p class="callout success">Hinweis: diese Bestätigung müsst Ihr immer nur einmal machen</p>

4.3 nochmal "Play" Knopf drücken

</td></tr><tr><td>5</td><td>Übertragung des Programms

</td><td>5.1 Calliope mini blinkt hier gelb

</td></tr></tbody></table>

## Programm speichern

<table border="1" id="bkmrk-1-%C2%A0-%C2%A0-2-%C2%A0-%C2%A0" style="border-collapse: collapse; width: 100%; height: 124px;"><colgroup><col style="width: 5.679012%;"></col><col style="width: 24.814815%;"></col><col style="width: 69.382716%;"></col></colgroup><tbody><tr style="height: 95px;"><td style="height: 95px;">1</td><td style="height: 95px;">bei OpenRoberta Lab anmelden</td><td style="height: 95px;">Solltest Du noch nicht bei OpenRoberta Lab eingeloggt sein, dann muss Du Dich mit Deinem Benutzernamen und Passwort anmelden.

  
Benutzername: evli-kurs-***dein\_vorname***

Passwort: evli-kurs

</td></tr><tr style="height: 29px;"><td style="height: 29px;">2</td><td style="height: 29px;">Programm speichern</td><td style="height: 29px;">Menüpunkt Bearbeiten -&gt; Speichern unter aufrufen

Programm unter einem passenden Namen abspeichern.

<p class="callout danger">Hinweis: Der Programmname kann nur aus Buchstaben und Zahlen bestehen. Er muss mit einem Buchstaben beginnen. </p>

</td></tr></tbody></table>

## gespeichertes Programm wieder aufrufen


<table border="1" id="bkmrk-1-%C2%A0-%C2%A0-2-%C2%A0" style="border-collapse: collapse; width: 100%; height: 39px;"><colgroup><col style="width: 5.679012%;"></col><col style="width: 24.814815%;"></col><col style="width: 69.382716%;"></col></colgroup><tbody><tr style="height: 10px;"><td style="height: 10px;">1</td><td style="height: 10px;">bei OpenRoberta Lab anmelden</td><td style="height: 10px;">Solltest Du noch nicht bei OpenRoberta Lab eingeloggt sein, dann muss Du Dich mit Deinem Benutzernamen und Passwort anmelden.

</td></tr><tr style="height: 29px;"><td style="height: 29px;">2</td><td style="height: 29px;">Programm</td><td style="height: 29px;">  
</td></tr></tbody></table>

# Calliope - 1: Smiley

### Ziel

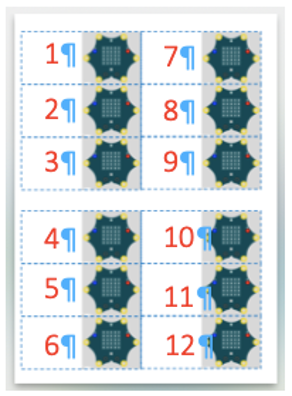
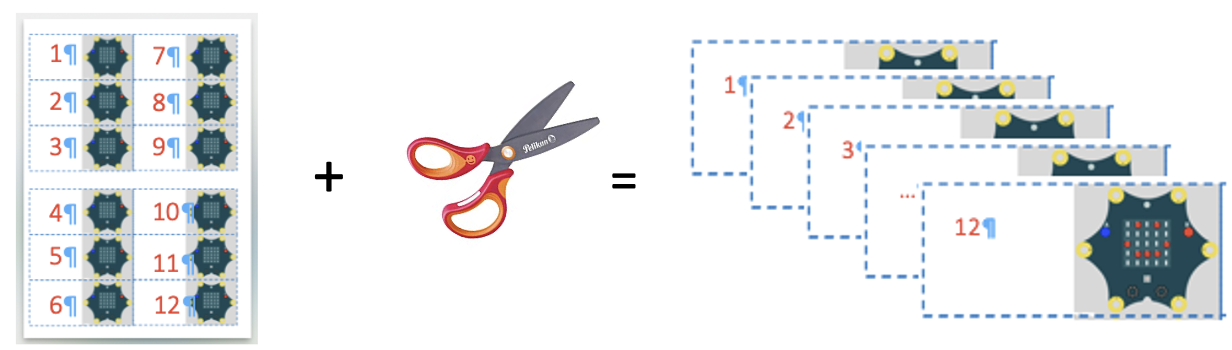
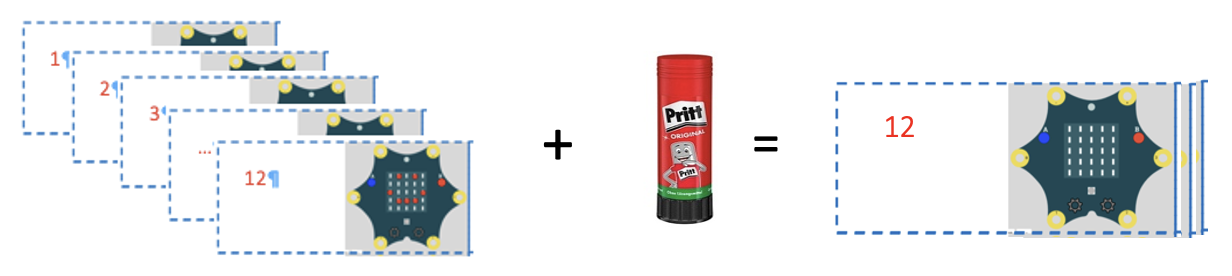
Wir wollen ein Daumenkino aus Papier basteln. Wir wollen dann den Calliope-mini so programmieren, dass auch er ein Daumenkino abspielt.

### Voraussetzungen / Materialien

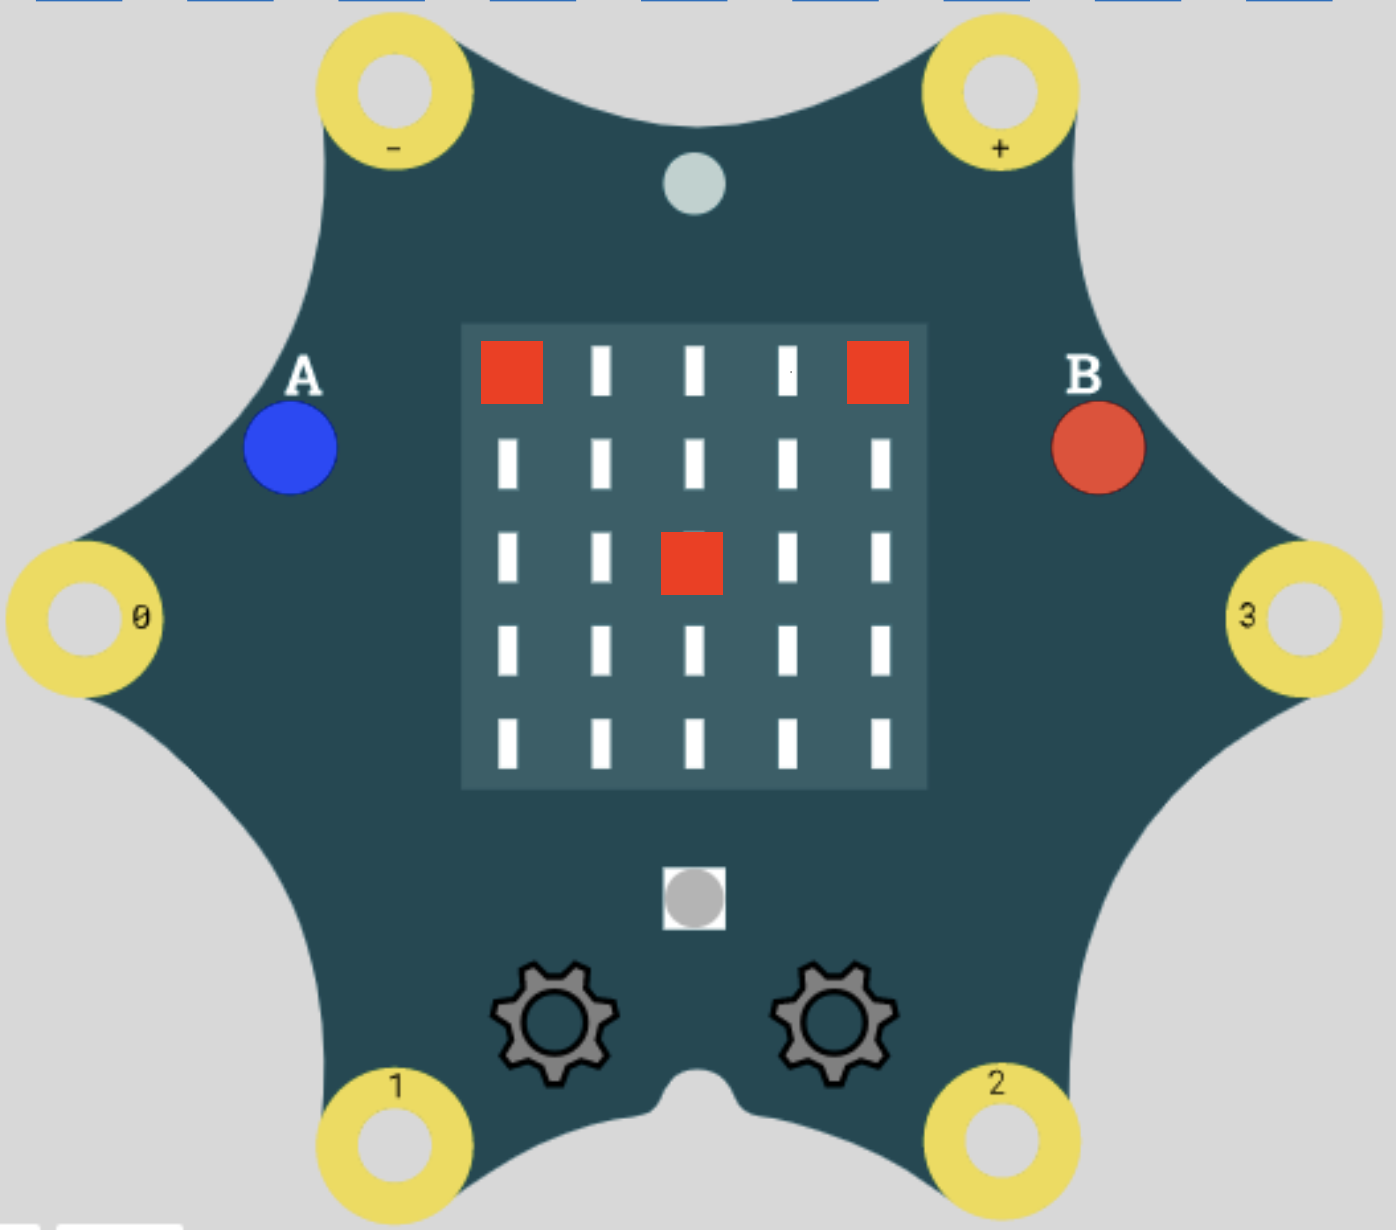
<table border="1" id="bkmrk-" style="border-collapse: collapse; width: 100%; height: 372px;"><colgroup><col style="width: 21.071429%;"></col><col style="width: 17.380952%;"></col><col style="width: 18.809524%;"></col><col style="width: 20.47619%;"></col><col style="width: 22.142857%;"></col></colgroup><tbody><tr style="height: 148px;"><td>**Calliope**

**[![image.jpeg](https://calliope.codingkidz.de/wiki/uploads/images/gallery/2025-06/scaled-1680-/22ximage.jpeg)](https://calliope.codingkidz.de/wiki/uploads/images/gallery/2025-06/22ximage.jpeg)**

</td><td style="height: 148px;">**Calliope Bogen**

**[![image.png](https://calliope.codingkidz.de/wiki/uploads/images/gallery/2025-06/scaled-1680-/Cuzimage.png)](https://calliope.codingkidz.de/wiki/attachments/76)**

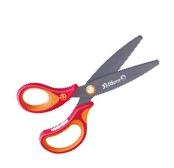
</td><td style="height: 148px;">**Schere**

**[![image.jpeg](https://calliope.codingkidz.de/wiki/uploads/images/gallery/2025-06/scaled-1680-/image.jpeg)](https://calliope.codingkidz.de/wiki/uploads/images/gallery/2025-06/image.jpeg)**

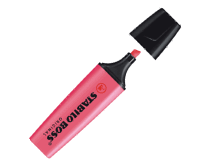
</td><td style="height: 148px;">**Stift**

**[![image.gif](https://calliope.codingkidz.de/wiki/uploads/images/gallery/2025-06/2uZimage.gif)](https://calliope.codingkidz.de/wiki/uploads/images/gallery/2025-06/2uZimage.gif)**

</td><td style="height: 148px;">**Kleber**

**[![image.jpeg](https://calliope.codingkidz.de/wiki/uploads/images/gallery/2025-06/scaled-1680-/4lyimage.jpeg)](https://calliope.codingkidz.de/wiki/uploads/images/gallery/2025-06/4lyimage.jpeg)**

</td></tr></tbody></table>

### Aufgabe 1 - Papier Daumenkino 

<table border="1" id="bkmrk-1-2-3-4" style="border-collapse: collapse; width: 100%; height: 122px;"><colgroup><col style="width: 5.595238%;"></col><col style="width: 31.071429%;"></col><col style="width: 63.214286%;"></col></colgroup><tbody><tr style="height: 35px;"><td style="height: 35px;">1</td><td style="height: 35px;">Nimm Dir einen ausgedruckten Calliope Bogen.

</td><td style="height: 35px;">**[![image.png](https://calliope.codingkidz.de/wiki/uploads/images/gallery/2025-06/scaled-1680-/Cuzimage.png)](https://calliope.codingkidz.de/wiki/attachments/76)**

[Vorlage\_Daumenkino\_12.pdf](https://calliope.codingkidz.de/wiki/attachments/77)

</td></tr><tr style="height: 29px;"><td style="height: 29px;">2</td><td style="height: 29px;">Male die 5x5 Felder so aus, dass eine Figur entsteht.

Die Punkte verändern sich von   
Blatt zu Blatt, so dass eine Bewegung entsteht, wenn man die Blätter nacheinander angezeigt werden.

</td><td style="height: 29px;">[![Bildschirmfoto 2025-06-01 um 16.52.18.png](https://calliope.codingkidz.de/wiki/uploads/images/gallery/2025-06/scaled-1680-/bildschirmfoto-2025-06-01-um-16-52-18.png)](https://calliope.codingkidz.de/wiki/uploads/images/gallery/2025-06/bildschirmfoto-2025-06-01-um-16-52-18.png)

</td></tr><tr style="height: 29px;"><td style="height: 29px;">3</td><td style="height: 29px;">Schneide die einzelnen Blätter des Calliope-Bogens aus und sortiere sie in der richtigen Reihenfolge.

</td><td style="height: 29px;">[![Bildschirmfoto 2025-06-01 um 16.14.48.png](https://calliope.codingkidz.de/wiki/uploads/images/gallery/2025-06/scaled-1680-/bildschirmfoto-2025-06-01-um-16-14-48.png)](https://calliope.codingkidz.de/wiki/uploads/images/gallery/2025-06/bildschirmfoto-2025-06-01-um-16-14-48.png)

</td></tr><tr style="height: 29px;"><td style="height: 29px;">4</td><td style="height: 29px;">Klebe die Blätter in der richtigen Reihenfolge zusammen. Achte darauf, dass die Blätter etwas versetzt zusammengeklebt werden, damit Du die Blätter auch gut mit dem Daumen bewegen kannst. </td><td style="height: 29px;">[![Bildschirmfoto 2025-06-01 um 16.16.21.png](https://calliope.codingkidz.de/wiki/uploads/images/gallery/2025-06/scaled-1680-/bildschirmfoto-2025-06-01-um-16-16-21.png)](https://calliope.codingkidz.de/wiki/uploads/images/gallery/2025-06/bildschirmfoto-2025-06-01-um-16-16-21.png)

</td></tr><tr><td>5</td><td>Probiere es aus. </td><td></td></tr></tbody></table>

### Aufgabe 2 - Calliope Daumenkino 

<table border="1" id="bkmrk-1-klicke-auf-https%3A%2F" style="border-collapse: collapse; width: 100%; height: 122px;"><colgroup><col style="width: 5.595238%;"></col><col style="width: 31.071429%;"></col><col style="width: 63.214286%;"></col></colgroup><tbody><tr style="height: 35px;"><td style="height: 35px;">1</td><td style="height: 35px;">klicke auf [https://codingkidz.de](https://codingkidz.de)

Wähle den Calliope mini aus, um die Programmierumgebung zu starten

</td><td style="height: 35px;">[![Bildschirmfoto 2025-06-01 um 16.26.47.png](https://calliope.codingkidz.de/wiki/uploads/images/gallery/2025-06/scaled-1680-/bildschirmfoto-2025-06-01-um-16-26-47.png)](https://calliope.codingkidz.de/wiki/uploads/images/gallery/2025-06/bildschirmfoto-2025-06-01-um-16-26-47.png)

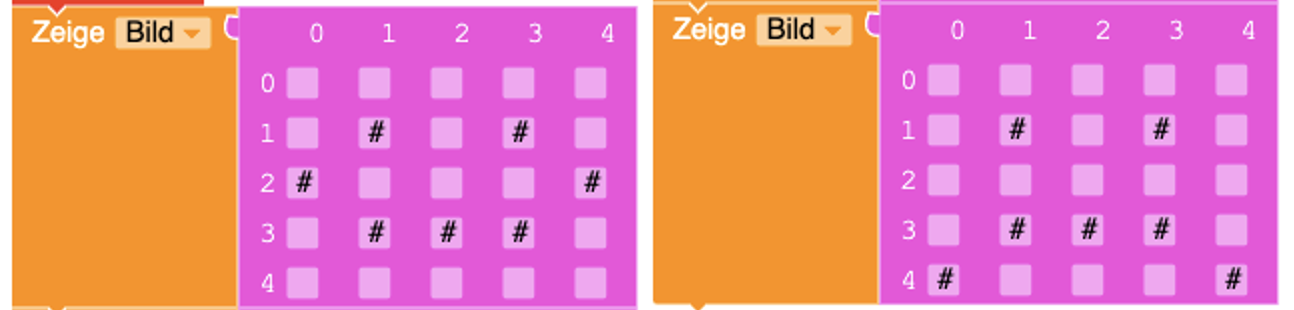
</td></tr><tr><td>2</td><td>Auf dem Calliope-mini soll abwechselnd einen lachenden und traurigen Smiley angezeigt werden.

1. Stelle einen Smiley auf der Anzeige des Calliope-minis dar.
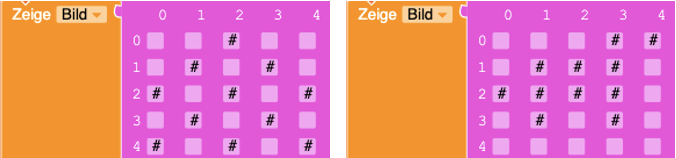
2. Nutze dafür die Zeige Bild Blöcke für einen lachenden und einen traurigen Smiley.

</td><td>[![image.png](https://calliope.codingkidz.de/wiki/uploads/images/gallery/2025-06/scaled-1680-/B3simage.png)](https://calliope.codingkidz.de/wiki/uploads/images/gallery/2025-06/B3simage.png)

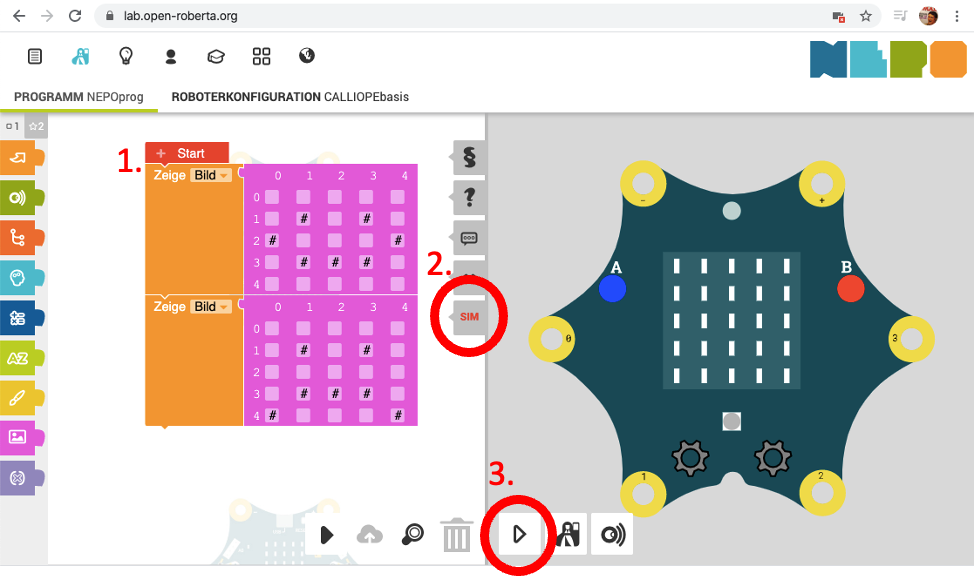
</td></tr><tr><td>3</td><td>1. Docke die beiden Smiley-Blöcke untereinander an den Start-Block.
2. Klicke den SIM Tabulator für die Simulation der Programmierung.
3. Klicke auf den Play-Knopf, um die Simulation zu starten.

</td><td>[![image.png](https://calliope.codingkidz.de/wiki/uploads/images/gallery/2025-06/scaled-1680-/Urrimage.png)](https://calliope.codingkidz.de/wiki/uploads/images/gallery/2025-06/Urrimage.png)

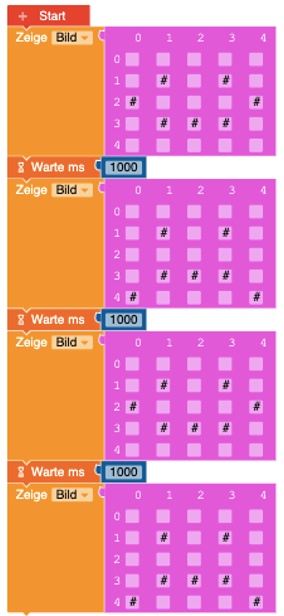
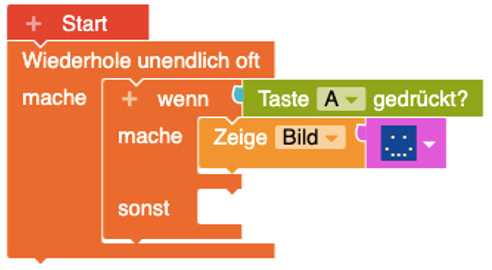
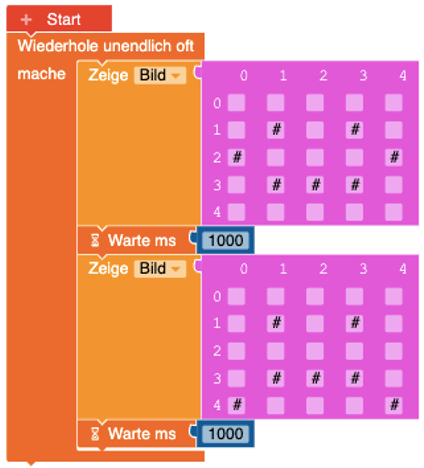
</td></tr><tr><td>4</td><td>Führe das folgende Programm in der Simulation aus.

Wie häufig wechseln sich die Smileys ab?

1. niemals
2. viermal
3. unendlich oft

</td><td>[![image.png](https://calliope.codingkidz.de/wiki/uploads/images/gallery/2025-06/scaled-1680-/0Utimage.png)](https://calliope.codingkidz.de/wiki/uploads/images/gallery/2025-06/0Utimage.png)

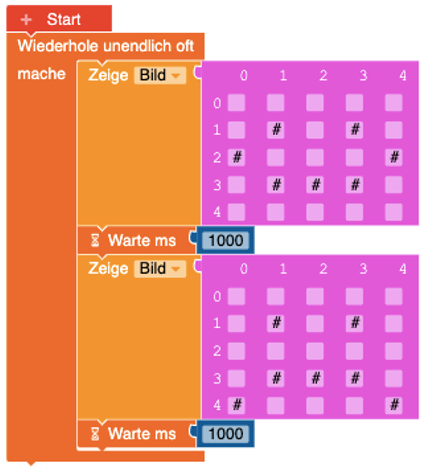
</td></tr><tr><td>5</td><td>Führe das folgende Programm in der Simulation aus.

Wie häufig wechseln sich die Smileys ab?

1. niemals
2. viermal
3. unendlich oft

</td><td>[![image.png](https://calliope.codingkidz.de/wiki/uploads/images/gallery/2025-06/scaled-1680-/upKimage.png)](https://calliope.codingkidz.de/wiki/uploads/images/gallery/2025-06/upKimage.png)

</td></tr></tbody></table>

### Experimentierzeit

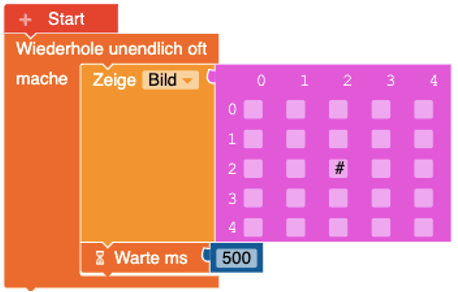
<table border="1" id="bkmrk-1-2-3-4-1" style="border-collapse: collapse; width: 100%; height: 390px;"><colgroup><col style="width: 5.595238%;"></col><col style="width: 31.190476%;"></col><col style="width: 63.095238%;"></col></colgroup><tbody><tr style="height: 303px;"><td style="height: 303px;">1</td><td style="height: 303px;">Auf der Anzeige des Calliope-mini soll ein springender Punkt zu sehen sein

- Programmiere eine Folge von Zeige Bild Blöcken auf denen sich ein Punkt hüpfend bewegt.
- Erweitere dafür das folgende Programm.

</td><td style="height: 303px;">[![image.png](https://calliope.codingkidz.de/wiki/uploads/images/gallery/2025-06/scaled-1680-/8YDimage.png)](https://calliope.codingkidz.de/wiki/uploads/images/gallery/2025-06/8YDimage.png)

</td></tr><tr style="height: 29px;"><td style="height: 29px;">2</td><td style="height: 29px;">Welche Wiederholungsschleife müsstest Du benutzen, damit sich Deine Bilder-Sequenz 10 mal wiederholt?

</td><td style="height: 29px;">[![Bildschirmfoto 2025-06-01 um 16.38.40.png](https://calliope.codingkidz.de/wiki/uploads/images/gallery/2025-06/scaled-1680-/bildschirmfoto-2025-06-01-um-16-38-40.png)](https://calliope.codingkidz.de/wiki/uploads/images/gallery/2025-06/bildschirmfoto-2025-06-01-um-16-38-40.png)

</td></tr><tr style="height: 29px;"><td style="height: 29px;">3</td><td style="height: 29px;">- Erweitere das Programm um weitere Bilder.
- Wie könnte ein Raketenstart aussehen?
- Wie könnte ein laufender Hund aussehen?

</td><td style="height: 29px;">[![image.png](https://calliope.codingkidz.de/wiki/uploads/images/gallery/2025-06/scaled-1680-/LIOimage.png)](https://calliope.codingkidz.de/wiki/uploads/images/gallery/2025-06/LIOimage.png)

</td></tr></tbody></table>

# Calliope - 2: Zufallsspiele

### Ziel

Wir wollen den Calliope-mini weiter kennenlernen und mit Zufallszahlen spielen. Wir werden folgende Programme erstellen:

- einen einfachen Würfel
- einen komplexen Würfel
- das Spiel Papier, Stein, Schere

### Voraussetzungen 

<table border="1" id="bkmrk-" style="border-collapse: collapse; width: 100%; height: 302px;"><colgroup><col style="width: 42.857143%;"></col><col style="width: 57.142857%;"></col></colgroup><tbody><tr><td>Die folgenden Operatoren solltet Ihr kennen</td><td></td></tr><tr style="height: 273px;"><td style="height: 273px;">- Schleifen 
    - Wiederhole unendlich oft
- Wenn-Mache-Sonst Operator

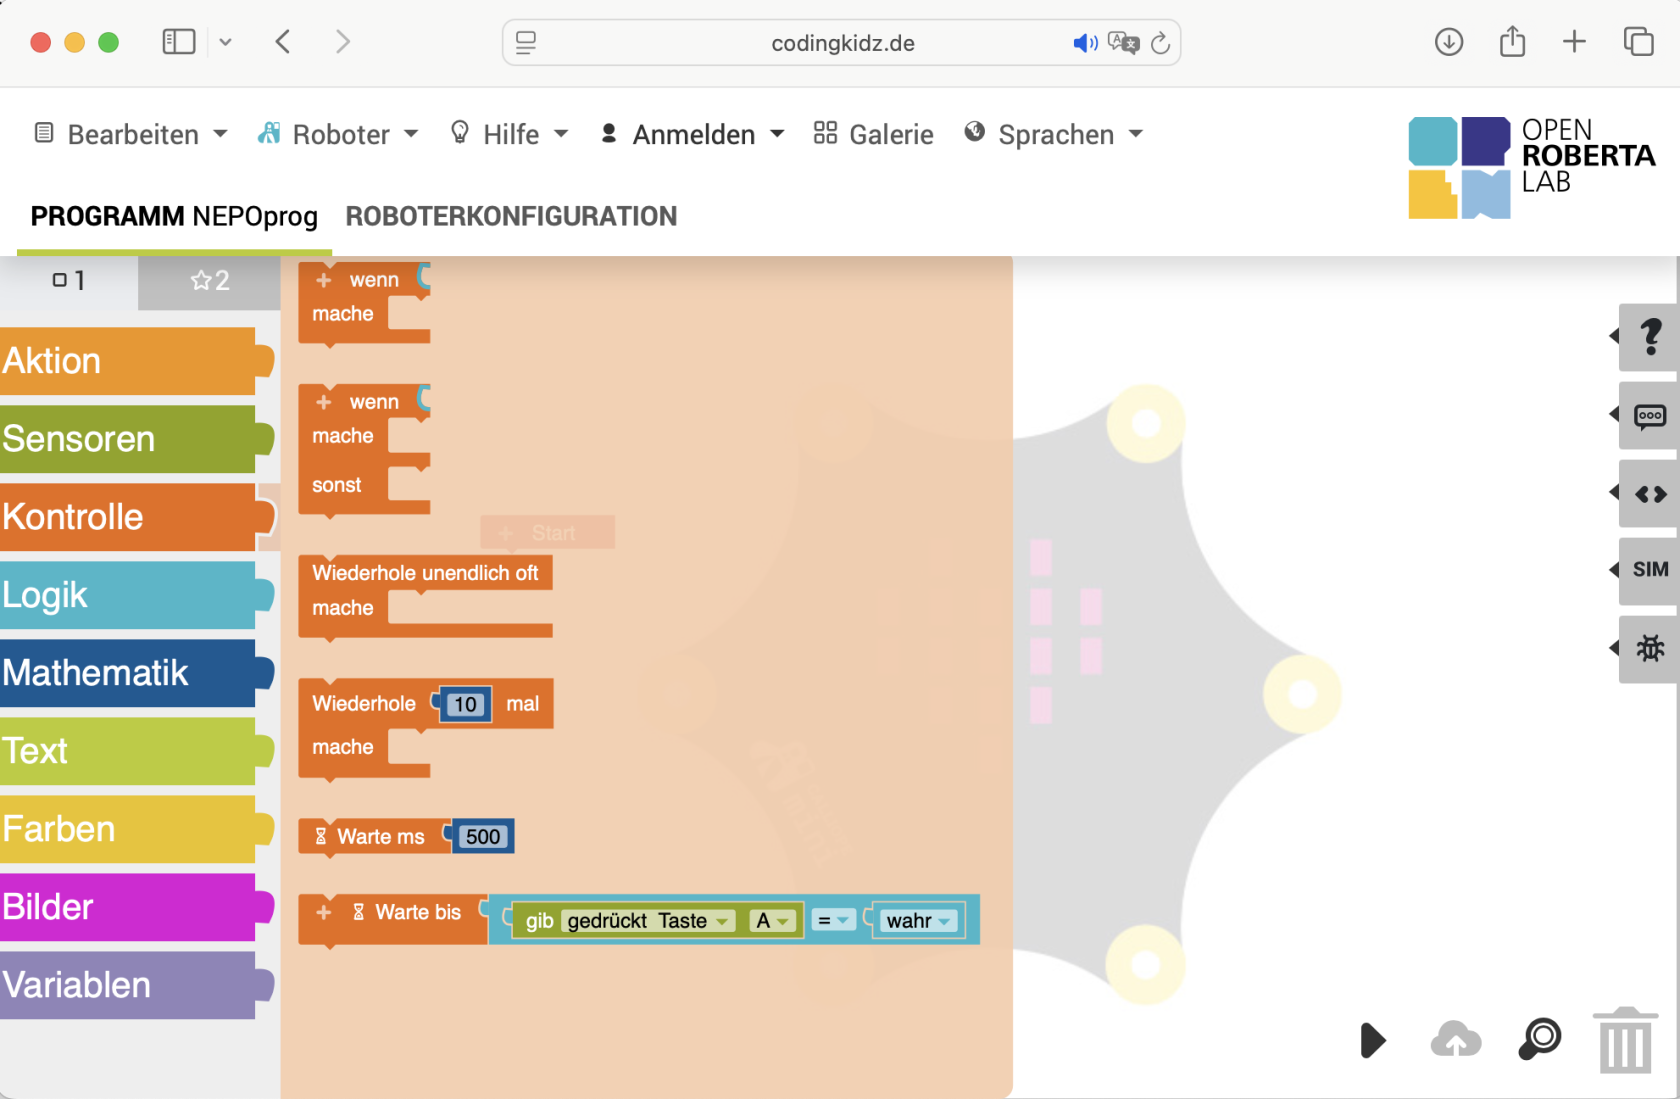
</td><td style="height: 273px;">[![image.png](https://calliope.codingkidz.de/wiki/uploads/images/gallery/2025-06/scaled-1680-/4HCimage.png)](https://calliope.codingkidz.de/wiki/uploads/images/gallery/2025-06/4HCimage.png)

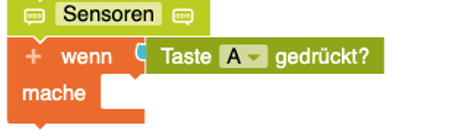
</td></tr><tr style="height: 29px;"><td style="height: 29px;">- Basis Sensoren 
    - Taste A/B

</td><td style="height: 29px;">[![image.png](https://calliope.codingkidz.de/wiki/uploads/images/gallery/2025-06/scaled-1680-/9xaimage.png)](https://calliope.codingkidz.de/wiki/uploads/images/gallery/2025-06/9xaimage.png)

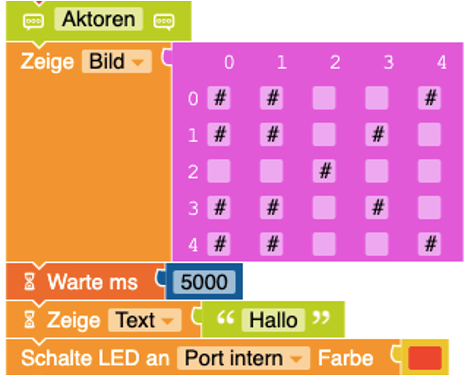
</td></tr><tr><td>- Basis Aktoren 
    - Zeige Bild
    - Zeige Text
- und Warten-Funktione

</td><td>[![image.png](https://calliope.codingkidz.de/wiki/uploads/images/gallery/2025-06/scaled-1680-/jPSimage.png)](https://calliope.codingkidz.de/wiki/uploads/images/gallery/2025-06/jPSimage.png)

</td></tr></tbody></table>

### Aufgabe 1 - einfacher Würfel

<table border="1" id="bkmrk-1-2-3-4" style="border-collapse: collapse; width: 100%;"><colgroup><col style="width: 5.595238%;"></col><col style="width: 38.809524%;"></col><col style="width: 55.47619%;"></col></colgroup><tbody><tr><td>1</td><td>Zufallszahlen zwischen 1 und 6 können mit einem Würfel erzeugt werden. Legt man einen Würfel in einen Würfelbecher, und schüttelt diesen kurz, bleibt der Würfel zufällig auf einer Seite liegen. Schaut man in den Becher, dann kann man die Punkte auf dem Würfel ablesen und hat so eine Zufallszahl.

Beim Calliope-mini gibt es die folgende Funktion zur Generierung von Zufallszahlen.

</td><td>[![image.png](https://calliope.codingkidz.de/wiki/uploads/images/gallery/2025-06/scaled-1680-/5tHimage.png)](https://calliope.codingkidz.de/wiki/uploads/images/gallery/2025-06/5tHimage.png)

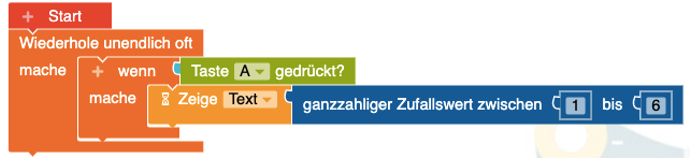
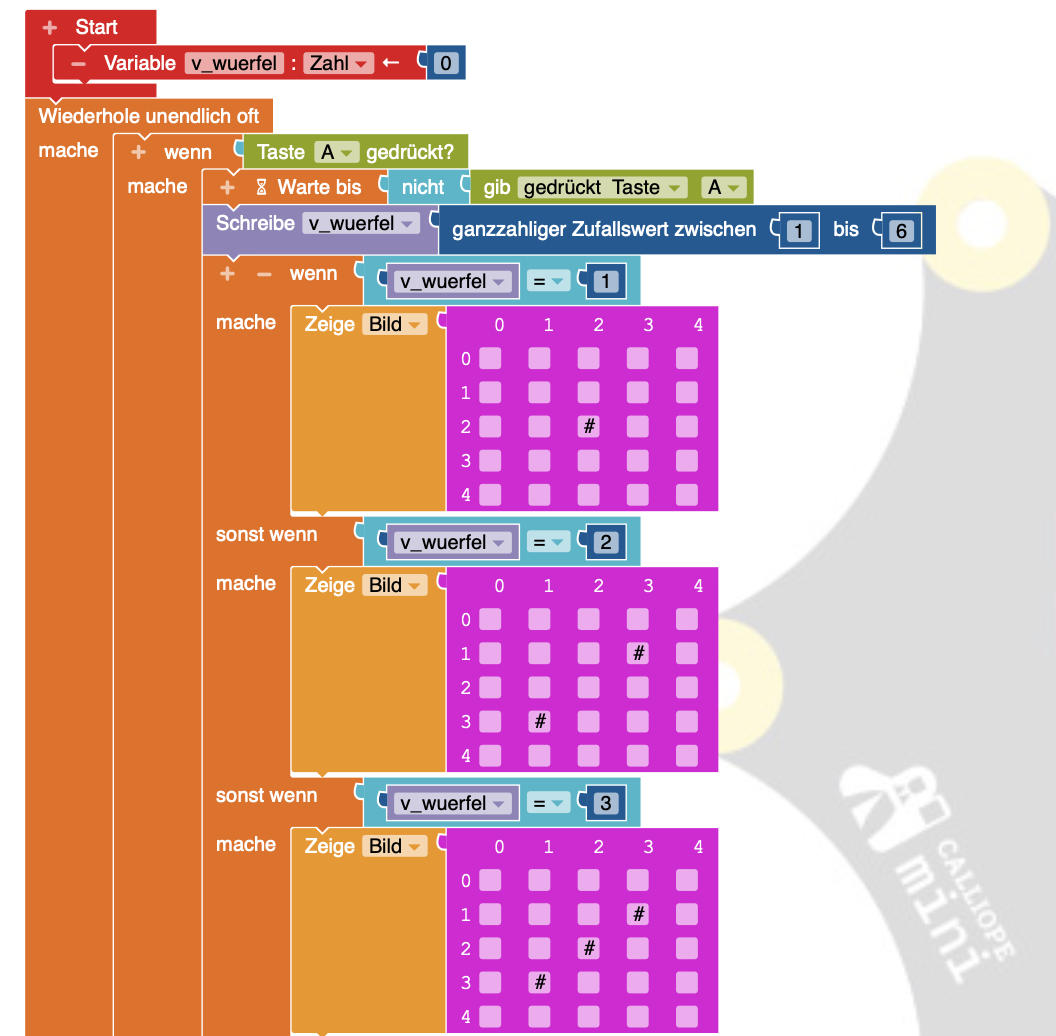
</td></tr><tr><td>2</td><td>Mit dem folgenden Programm kannst Du Dir Zufallszahlen zwischen 1 und 6 anzeigen.

Führe das Programm auf Deinem Calliope-mini aus.

1. Was passiert, wenn Du die Taste-A drückst?
2. Was passiert, wenn Du die Taste-B drückst?
3. Welche Zahl hast Du in 20 Versuchen am meisten „gewürfelt“?

</td><td>[![image.png](https://calliope.codingkidz.de/wiki/uploads/images/gallery/2025-06/scaled-1680-/X6rimage.png)](https://calliope.codingkidz.de/wiki/uploads/images/gallery/2025-06/X6rimage.png)

</td></tr></tbody></table>

### Aufgabe 2 - komplexer Würfel

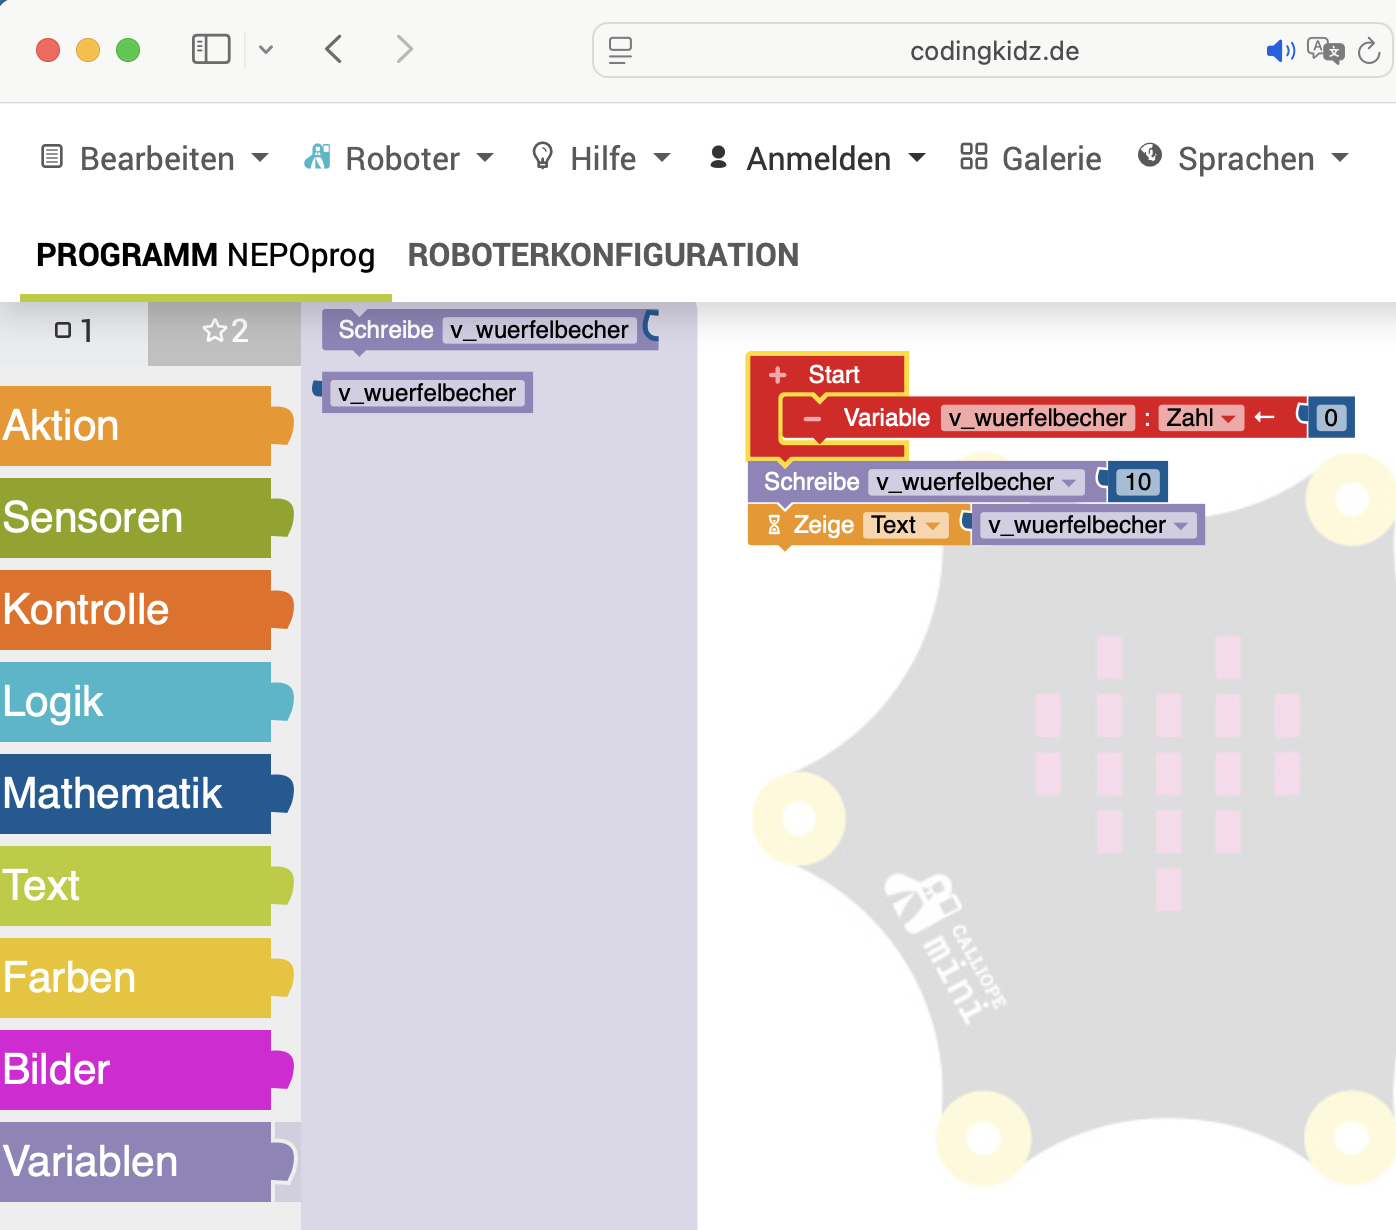
<table border="1" id="bkmrk-1-in-einem-w%C3%BCrfelbec" style="border-collapse: collapse; width: 100%;"><colgroup><col style="width: 5.595238%;"></col><col style="width: 38.809524%;"></col><col style="width: 55.47619%;"></col></colgroup><tbody><tr><td>1</td><td>In einem Würfelbecher ist ein Würfel enthalten. Die Punktezahl des Würfels entspricht dem Wert. Wenn man den Becher schüttelt, dann ändert sich die Punktezahl des Würfels. Schaut man in den Würfelbecher hinein, dann sieht man die neue Punkteanzahl.

Variablen:

- Variablenname = Würfelbecher
- Variablentyp = Zahl
- Variablenwert = Punktezahl des Versuches
- Schreiben eines neuen Werts in die Variable = Schütteln des Würfelbechers
- Lesen des neues Variablenwertes = Hineinschauen in den Würfelbecher

</td><td>[![Bildschirmfoto 2025-06-01 um 18.32.29.png](https://calliope.codingkidz.de/wiki/uploads/images/gallery/2025-06/scaled-1680-/bildschirmfoto-2025-06-01-um-18-32-29.png)](https://calliope.codingkidz.de/wiki/uploads/images/gallery/2025-06/bildschirmfoto-2025-06-01-um-18-32-29.png)

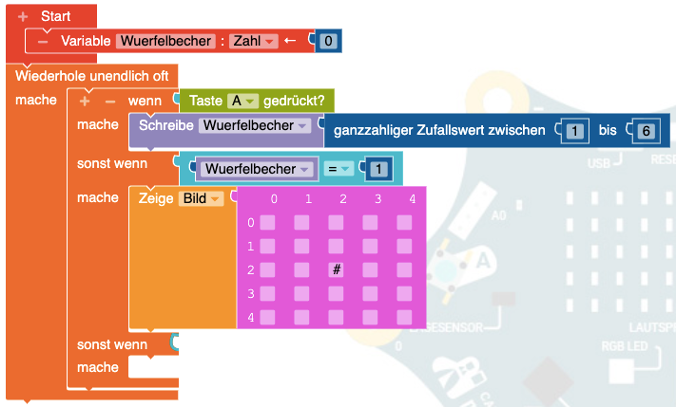
</td></tr><tr><td>2</td><td>Erweitere das Programm im rechten Kasten so, dass

1. die Punkte des Würfelversuchs auch als Punkte angezeigt werden.
2. Was passiert, wenn Du die Taste-A drückst?
3. Was passiert, wenn Du die Taste-B drückst?
4. Welche Zahl hast Du in 20 Versuchen am meisten „gewürfelt“?

</td><td>[![image.png](https://calliope.codingkidz.de/wiki/uploads/images/gallery/2025-06/scaled-1680-/ysWimage.png)](https://calliope.codingkidz.de/wiki/uploads/images/gallery/2025-06/ysWimage.png)

</td></tr></tbody></table>


### Aufgabe 3 - Schere, Stein, Papier

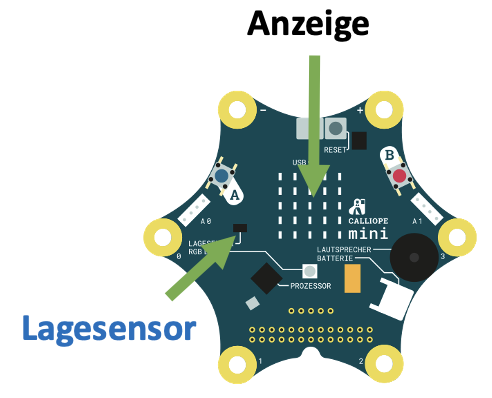
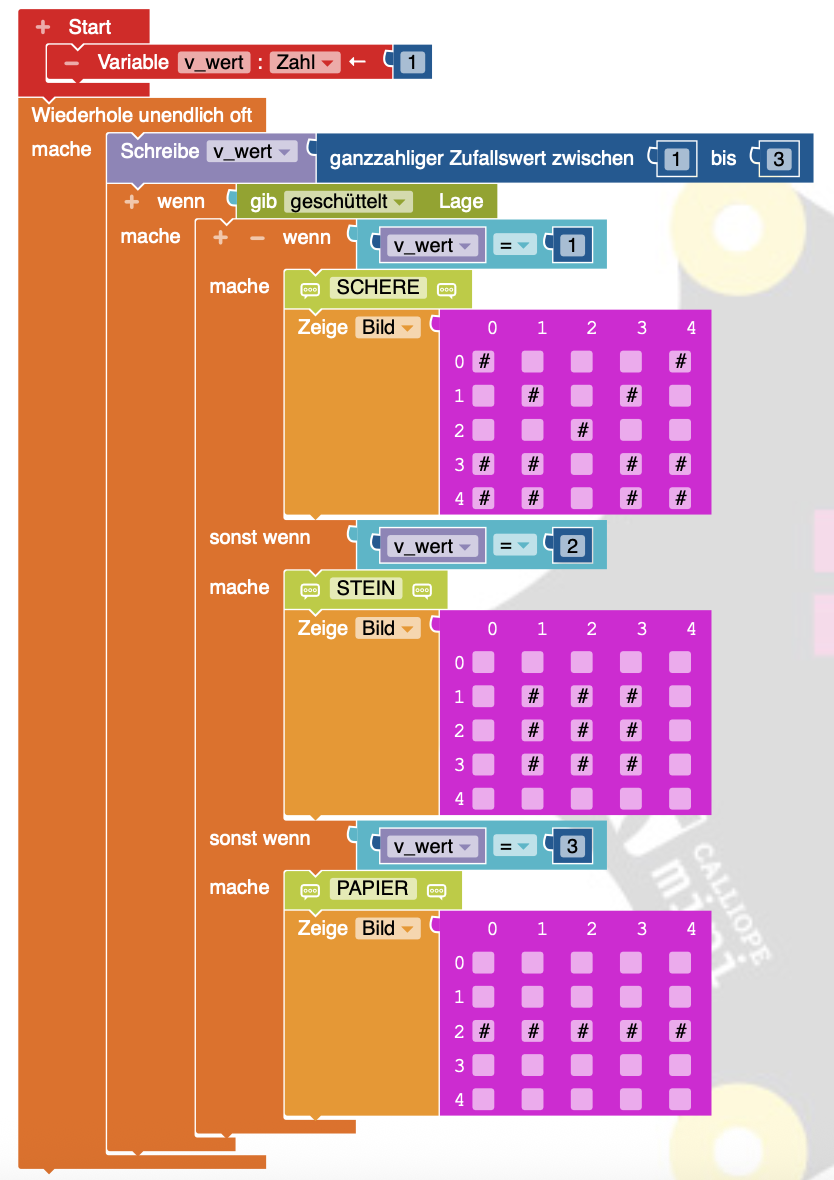
<table border="1" id="bkmrk-1-mit-dem-calliope-m" style="border-collapse: collapse; width: 100%; height: 359.53125px;"><colgroup><col style="width: 5.595238%;"></col><col style="width: 32.738095%;"></col><col style="width: 61.547619%;"></col></colgroup><tbody><tr style="height: 225.09375px;"><td style="height: 225.09375px;">1</td><td style="height: 225.09375px;">Mit dem Calliope-mini soll das Spiel Papier, Stein, Schere gespielt werden können. Dabei soll der Calliope-mini nachdem er geschüttelt wurde, ein Symbol zufällig auswählen und auf der Anzeige darstellen.

Dafür benötigst Du die folgenden Calliope Komponenten:

- Anzeige
- Lagesensor

</td><td style="height: 225.09375px;">[![Bildschirmfoto 2025-06-01 um 18.36.48.png](https://calliope.codingkidz.de/wiki/uploads/images/gallery/2025-06/scaled-1680-/bildschirmfoto-2025-06-01-um-18-36-48.png)](https://calliope.codingkidz.de/wiki/uploads/images/gallery/2025-06/bildschirmfoto-2025-06-01-um-18-36-48.png)

</td></tr><tr style="height: 105.4375px;"><td style="height: 105.4375px;">2</td><td style="height: 105.4375px;">Überlege Dir, wie Du die Symbole Papier, Stein und Schere auf der Anzeige darstellen möchtest.   
Male die Symbole auf.

</td><td style="height: 105.4375px;"><table border="1" style="border-collapse: collapse; width: 100.176367%;"><colgroup><col style="width: 33.274648%;"></col><col style="width: 33.274648%;"></col><col style="width: 33.274648%;"></col></colgroup><tbody><tr><td>**Schere**

**[![image.png](https://calliope.codingkidz.de/wiki/uploads/images/gallery/2025-06/scaled-1680-/NHVimage.png)](https://calliope.codingkidz.de/wiki/uploads/images/gallery/2025-06/NHVimage.png)**

</td><td>**Stein**

**[![image.png](https://calliope.codingkidz.de/wiki/uploads/images/gallery/2025-06/scaled-1680-/NHVimage.png)](https://calliope.codingkidz.de/wiki/uploads/images/gallery/2025-06/NHVimage.png)**

</td><td>**Papier**

**[![image.png](https://calliope.codingkidz.de/wiki/uploads/images/gallery/2025-06/scaled-1680-/NHVimage.png)](https://calliope.codingkidz.de/wiki/uploads/images/gallery/2025-06/NHVimage.png)**

</td></tr></tbody></table>

  
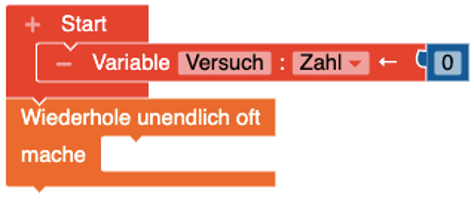
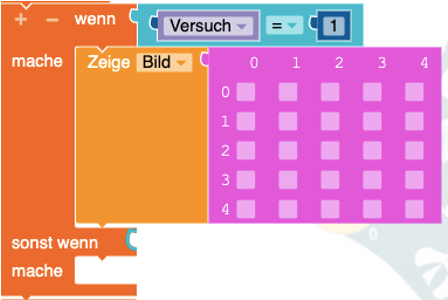
</td></tr><tr style="height: 29px;"><td style="height: 29px;">3</td><td style="height: 29px;">Programmiere den folgenden Ablauf ... </td><td style="height: 29px;">- Wird der Calliope-mini geschüttelt, dann wird eine Zufallszahl zwischen 1 und 3 in die Variable Versuch geschrieben.
- Der Wert der Variable Versuch wird überprüft.
- Ist er: 
    1. dann wird Papier dargestellt.
    2. dann wird Stein dargestellt.
    3. dann wird Schere dargestellt.
- Die Schritte 1 und 2 wiederholen sich unendlich oft.

</td></tr><tr><td>4</td><td>... nutze dafür die folgenden Programmteile.

Erweitere diese, wenn nötig.

</td><td>[![image.png](https://calliope.codingkidz.de/wiki/uploads/images/gallery/2025-06/scaled-1680-/HVHimage.png)](https://calliope.codingkidz.de/wiki/uploads/images/gallery/2025-06/HVHimage.png)

[![image.png](https://calliope.codingkidz.de/wiki/uploads/images/gallery/2025-06/scaled-1680-/T59image.png)](https://calliope.codingkidz.de/wiki/uploads/images/gallery/2025-06/T59image.png)
[![image.png](https://calliope.codingkidz.de/wiki/uploads/images/gallery/2025-06/scaled-1680-/zsYimage.png)](https://calliope.codingkidz.de/wiki/uploads/images/gallery/2025-06/zsYimage.png)

</td></tr><tr><td>5</td><td>Probiere das Spiel aus.

</td><td>- spiele gegen einen Menschen.
- spiele gegen einen anderen Calliope-mini.

Wer gewinnt öfter, Mensch oder Maschine?

</td></tr></tbody></table>

### Experimentierzeit

<table border="1" id="bkmrk-1-2-3-4-1" style="border-collapse: collapse; width: 100%; height: 427.03125px;"><colgroup><col style="width: 5.595238%;"></col><col style="width: 39.166667%;"></col><col style="width: 55.119048%;"></col></colgroup><tbody><tr style="height: 296px;"><td style="height: 296px;">1</td><td style="height: 296px;">Programmiere einen Würfel, den auch nicht sehende Menschen nutzen können.

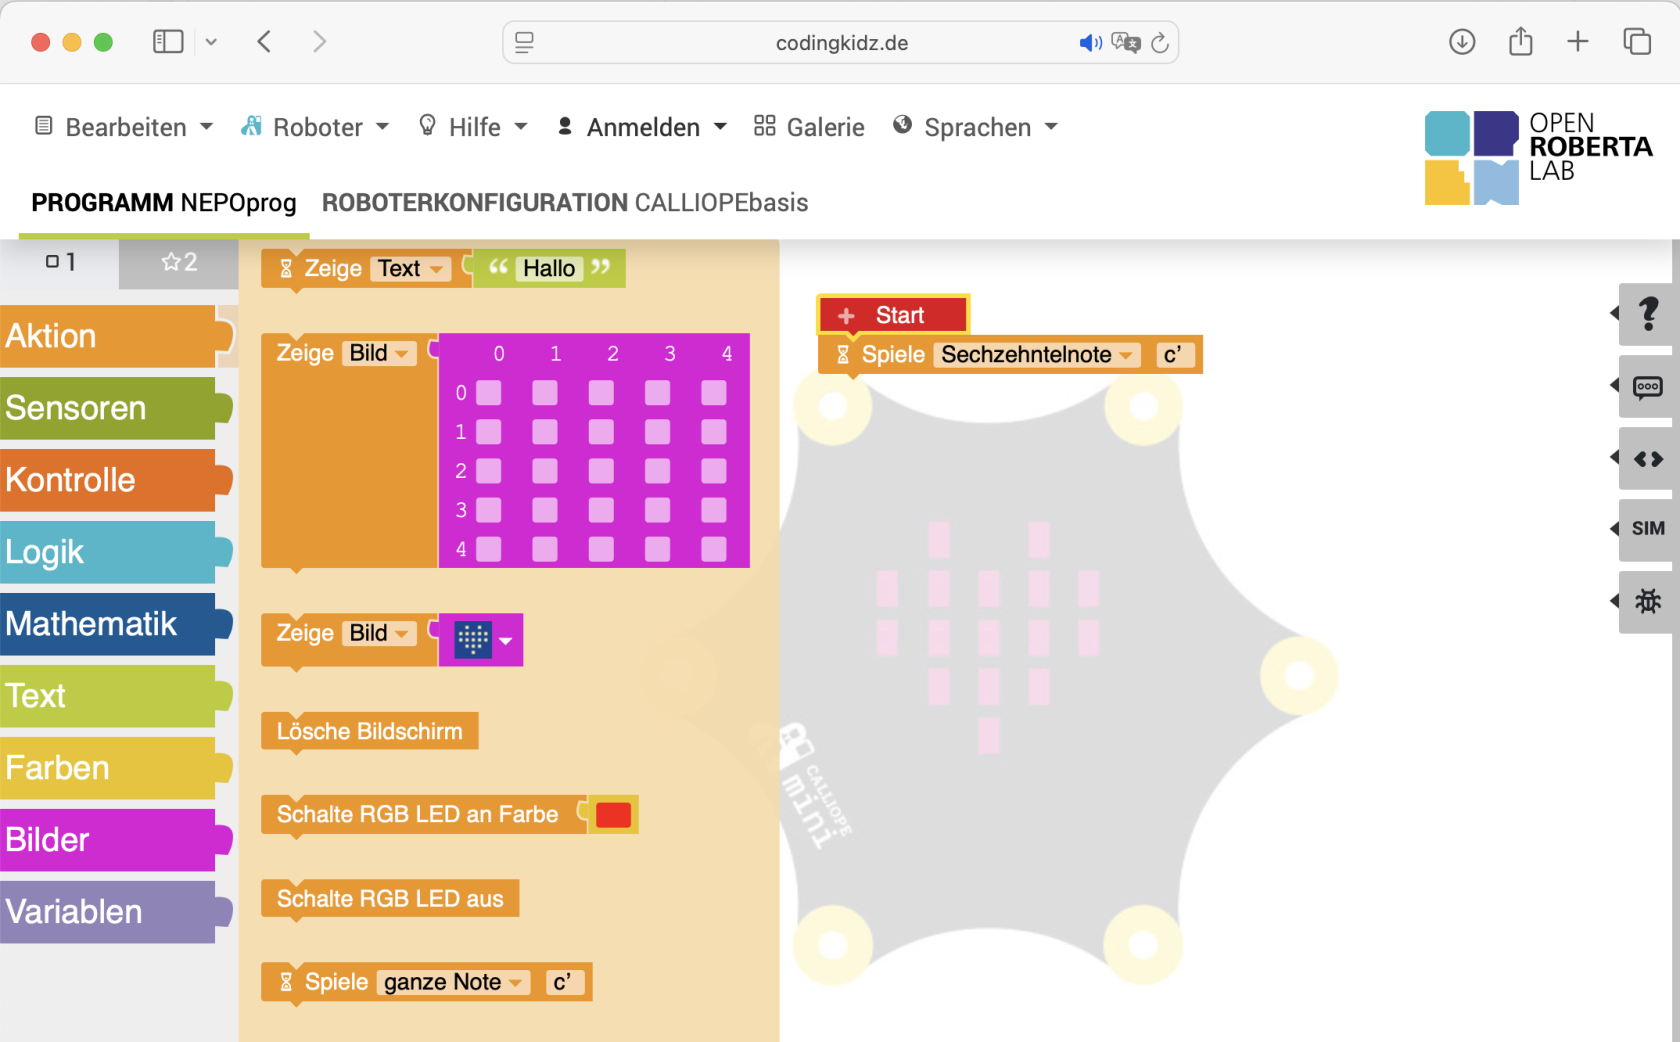
Nutze dabei den<span style="color: rgb(255, 255, 255);"> <span style="color: rgb(0, 0, 0);">orangenen Aktions </span></span><span style="color: rgb(0, 0, 0);">Block</span>

- <span style="color: rgb(0, 0, 0);"> </span><span style="background-color: rgb(230, 126, 35); color: rgb(255, 255, 255);">Spiele Sechzehntelnote c' </span>

</td><td style="height: 296px;">[![Bildschirmfoto 2025-06-01 um 18.52.09.png](https://calliope.codingkidz.de/wiki/uploads/images/gallery/2025-06/scaled-1680-/bildschirmfoto-2025-06-01-um-18-52-09.png)](https://calliope.codingkidz.de/wiki/uploads/images/gallery/2025-06/bildschirmfoto-2025-06-01-um-18-52-09.png)

</td></tr><tr style="height: 102.03125px;"><td style="height: 102.03125px;">2</td><td style="height: 102.03125px;">Wie kannst Du Deine Gewinn-Chancen bei Schere, Stein, Papier verbessern, so dass Du möglichst immer gewinnst?</td><td style="height: 102.03125px;">Idee:

Erstelle zwei Programme

1. "würfelt" häufiger Schere
2. "würfelt" häufiger Papier

</td></tr></tbody></table>

### Lösungen

<table border="1" id="bkmrk-1-einfacher-w%C3%BCrfel-2" style="border-collapse: collapse; width: 100%; height: 251px;"><colgroup><col style="width: 5.238095%;"></col><col style="width: 39.52381%;"></col><col style="width: 55.119048%;"></col></colgroup><tbody><tr style="height: 57px;"><td style="height: 57px;">1</td><td style="height: 57px;">einfacher Würfel

</td><td style="height: 57px;">[Würfel\_einfach.xml](https://calliope.codingkidz.de/wiki/attachments/84)

[Würfel\_einfach.hex](https://calliope.codingkidz.de/wiki/attachments/85)

</td></tr><tr style="height: 29px;"><td style="height: 29px;">2</td><td style="height: 29px;">komplexer Würfel</td><td style="height: 29px;">[Würfel.xml](https://calliope.codingkidz.de/wiki/attachments/82)

[Würfel.hex](https://calliope.codingkidz.de/wiki/attachments/83)

</td></tr><tr style="height: 29px;"><td style="height: 29px;">3</td><td style="height: 29px;">Würfel für nicht Sehende</td><td style="height: 29px;">[Würfel\_beep.xml](https://calliope.codingkidz.de/wiki/attachments/86)

[Würfel\_beep.hex](https://calliope.codingkidz.de/wiki/attachments/87)

</td></tr><tr style="height: 57px;"><td style="height: 57px;">4</td><td style="height: 57px;">Spiel - Schere, Stein, Papier</td><td style="height: 57px;">[SchereSteinPapier.xml](https://calliope.codingkidz.de/wiki/attachments/80)

[SchereSteinPapier.hex](https://calliope.codingkidz.de/wiki/attachments/81)

</td></tr><tr style="height: 79px;"><td style="height: 79px;">5</td><td style="height: 79px;">Spiel - Schere, Stein, Papier - immer gewinnen</td><td style="height: 79px;">[SchereSteinPapier\_cheating.xml](https://calliope.codingkidz.de/wiki/attachments/78)

[SchereSteinPapier\_cheating.hex](https://calliope.codingkidz.de/wiki/attachments/79)

siehe auch [Kommunikation](https://calliope.codingkidz.de/wiki/books/programmieren-mit-dem-calliope-mini/page/kommunikation "Kommunikation")

</td></tr></tbody></table>

# Calliope - 3: Alarmanlage

### Ziel

Wir wollen ein Daumenkino aus Papier basteln. Wir wollen dann den Calliope-mini so programmieren, dass auch er ein Daumenkino abspielt.

### Voraussetzungen / Materialien

<table border="1" id="bkmrk-" style="border-collapse: collapse; width: 100%;"><colgroup><col style="width: 42.857143%;"></col><col style="width: 57.142857%;"></col></colgroup><tbody><tr><td>  
</td><td>  
</td></tr><tr><td>  
</td><td>  
</td></tr></tbody></table>

### Aufgaben

<table border="1" id="bkmrk-1-2-3-4" style="border-collapse: collapse; width: 100%;"><colgroup><col style="width: 5.595238%;"></col><col style="width: 39.166667%;"></col><col style="width: 55.119048%;"></col></colgroup><tbody><tr><td>1</td><td>  
</td><td>  
</td></tr><tr><td>2</td><td>  
</td><td>  
</td></tr><tr><td>3</td><td>  
</td><td>  
</td></tr><tr><td>4</td><td>  
</td><td>  
</td></tr></tbody></table>

### Experimentierzeit

<table border="1" id="bkmrk-1-2-3-4-1" style="border-collapse: collapse; width: 100%;"><colgroup><col style="width: 5.595238%;"></col><col style="width: 39.166667%;"></col><col style="width: 55.119048%;"></col></colgroup><tbody><tr><td>1</td><td>  
</td><td>  
</td></tr><tr><td>2</td><td>  
</td><td>  
</td></tr><tr><td>3</td><td>  
</td><td>  
</td></tr><tr><td>4</td><td>  
</td><td>  
</td></tr></tbody></table>

# Calliope - 4: Musik

### Ziel

Wir wollen ein Daumenkino aus Papier basteln. Wir wollen dann den Calliope-mini so programmieren, dass auch er ein Daumenkino abspielt.

### Voraussetzungen / Materialien

<table border="1" id="bkmrk-" style="border-collapse: collapse; width: 100%;"><colgroup><col style="width: 42.857143%;"></col><col style="width: 57.142857%;"></col></colgroup><tbody><tr><td>  
</td><td>  
</td></tr><tr><td>  
</td><td>  
</td></tr></tbody></table>

### Aufgaben

<table border="1" id="bkmrk-1-2-3-4" style="border-collapse: collapse; width: 100%;"><colgroup><col style="width: 5.595238%;"></col><col style="width: 39.166667%;"></col><col style="width: 55.119048%;"></col></colgroup><tbody><tr><td>1</td><td>  
</td><td>  
</td></tr><tr><td>2</td><td>  
</td><td>  
</td></tr><tr><td>3</td><td>  
</td><td>  
</td></tr><tr><td>4</td><td>  
</td><td>  
</td></tr></tbody></table>

### Experimentierzeit

<table border="1" id="bkmrk-1-2-3-4-1" style="border-collapse: collapse; width: 100%;"><colgroup><col style="width: 5.595238%;"></col><col style="width: 39.166667%;"></col><col style="width: 55.119048%;"></col></colgroup><tbody><tr><td>1</td><td>  
</td><td>  
</td></tr><tr><td>2</td><td>  
</td><td>  
</td></tr><tr><td>3</td><td>  
</td><td>  
</td></tr><tr><td>4</td><td>  
</td><td>  
</td></tr></tbody></table>

# Calliope - 5: Ampel

### Ziel

Heute lernst du, wie eine echte Ampel funktioniert – und wie du selbst eine baust! Mit dem Calliope mini programmierst du deine eigene [Ampelsteuerung](https://www.youtube.com/watch?v=avNYUJ1duik) und sorgst dafür, dass der Verkehr sicher läuft. Schritt für Schritt lernst du, wie die Farben wechseln, warum Rot so wichtig ist – und wie zwei Ampeln sich sogar miteinander absprechen können.

### Funktionsweise

Eine Ampel sorgt dafür, dass der Straßenverkehr sicher und geordnet abläuft. Sie zeigt mit farbigem Licht, wer fahren darf und wer warten muss. Es gibt drei Farben, die immer in einer bestimmten [Reihenfolge](https://www.youtube.com/watch?v=v_Cc3uYle3k) leuchten:

- **Rot**: Alle müssen stehen bleiben. Es ist **Stop**.
- **Rot-Gelb** (nur in Deutschland und einigen Ländern): Jetzt gleich wird es grün – **bereit machen**!
- **Grün**: Jetzt darf man **fahren** oder **gehen**.
- **Gelb**: Achtung! Gleich wird es rot. Jetzt noch schnell stoppen, nicht mehr losfahren.

Diese Phasen wiederholen sich immer wieder. Wenn zwei Ampeln eine Kreuzung regeln, dürfen sie **niemals gleichzeitig grün** zeigen – sonst könnte es einen Unfall geben. Darum müssen die Ampeln gut aufeinander abgestimmt sein.

### Materialien

<table border="1" id="bkmrk-" style="border-collapse: collapse; width: 100%;"><colgroup><col style="width: 24.642857%;"></col><col style="width: 75.238095%;"></col></colgroup><thead><tr><td>Materialien

</td><td>Erläuterungen</td></tr></thead><tbody><tr><td>Bastelkram

</td><td>- Pappe
- Schere
- Klebestift

</td></tr><tr><td>Leuchtdioden LEDs

</td><td>vorgefertigte Ampel - Leuchtdioden

- rot
- gelb
- grün

</td></tr><tr><td>Klemmen

</td><td>4 Krokodil-Klemmen

- rot
- gelb
- grün
- weiss

</td></tr></tbody></table>

### Aufgaben

<table border="1" id="bkmrk-1-2-3-4" style="border-collapse: collapse; width: 100%; height: 326px;"><colgroup><col style="width: 5.595238%;"></col><col style="width: 39.166667%;"></col><col style="width: 55.119048%;"></col></colgroup><tbody><tr style="height: 29px;"><td style="height: 29px;">1</td><td style="height: 29px;">**Ampel basteln**  
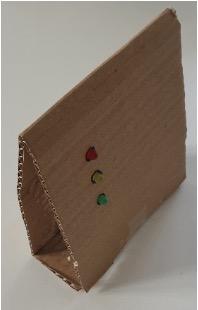
1. in der Calliope-mini Box findest Du die Ampel LEDs (Rot, Gelb, Grün)
2. Baue aus Pappe einen Aufsteller und befestige die LEDs und den Calliope daran.

Vorderseite [![image.jpeg](https://calliope.codingkidz.de/wiki/uploads/images/gallery/2025-06/scaled-1680-/ug1image.jpeg)](https://calliope.codingkidz.de/wiki/uploads/images/gallery/2025-06/ug1image.jpeg)
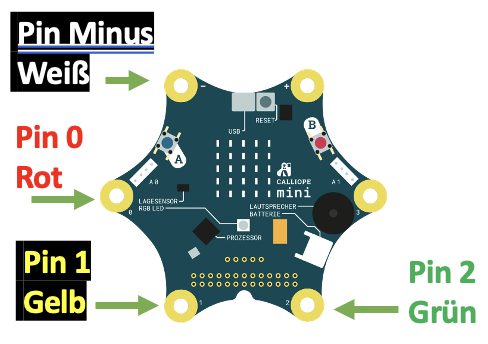
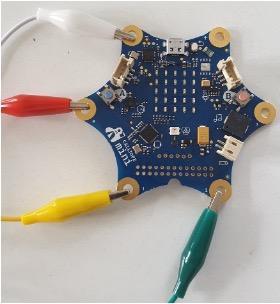
</td><td style="height: 29px;">Anschluss der Krokodilklemmen an den Calliope Mini

- weiss an Pin - (minus)
- rot an Pin 0
- gelb an Pin 1
- grün an Pin 2

[![image.jpeg](https://calliope.codingkidz.de/wiki/uploads/images/gallery/2025-06/scaled-1680-/7jWimage.jpeg)](https://calliope.codingkidz.de/wiki/uploads/images/gallery/2025-06/7jWimage.jpeg)
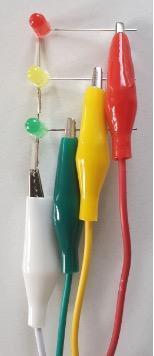
Anschluss der Krokodilklemmen an die Ampel-Leuchtdioden

[![image.jpeg](https://calliope.codingkidz.de/wiki/uploads/images/gallery/2025-06/scaled-1680-/tLZimage.jpeg)](https://calliope.codingkidz.de/wiki/uploads/images/gallery/2025-06/tLZimage.jpeg)
</td></tr><tr style="height: 29px;"><td style="height: 29px;">2</td><td style="height: 29px;">**Ampelsteuerunge programmieren**

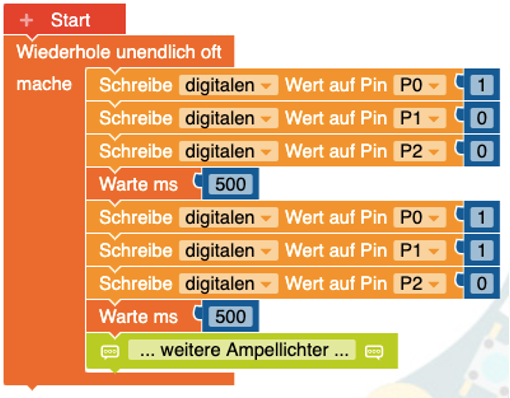
Um die LEDs einzeln an- oder auszuschalten, musst du die Pins 0, 1 und 2 aktivieren oder deaktivieren.

</td><td style="height: 29px;">[![image.png](https://calliope.codingkidz.de/wiki/uploads/images/gallery/2025-06/scaled-1680-/Zq9image.png)](https://calliope.codingkidz.de/wiki/uploads/images/gallery/2025-06/Zq9image.png)

</td></tr><tr style="height: 29px;"><td style="height: 29px;">2.1</td><td style="height: 29px;">Erstelle ein erstes Programm bei dem nacheinander alle LEDs einzeln an- und ausgeschaltet werden.

Folgendes Code-Fragment hilft dir dabei.

</td><td style="height: 29px;">[![image.png](https://calliope.codingkidz.de/wiki/uploads/images/gallery/2025-06/scaled-1680-/y0cimage.png)](https://calliope.codingkidz.de/wiki/uploads/images/gallery/2025-06/y0cimage.png)

</td></tr><tr><td>2.2</td><td>Verfeinere das Programm, so dass

- die LEDs mit der Farbreihenfolge einer Ampel (Rot, Gelb-Rot, Grün, Gelb, Rot) leuchten.

</td><td></td></tr><tr><td>2.3</td><td>Ändere das Programm nochmals, so dass

- durch Drücken der Taste-A in die nächste Ampelphase gesprungen wird.

</td><td></td></tr></tbody></table>

### Experimentierzeit

<table border="1" id="bkmrk-1-2-3-4-1" style="border-collapse: collapse; width: 100%; height: 323.234375px;"><colgroup><col style="width: 5.595238%;"></col><col style="width: 65.595238%;"></col><col style="width: 28.690476%;"></col></colgroup><tbody><tr><td>Nr</td><td>Experiment

</td><td>Programm

</td></tr><tr style="height: 45px;"><td style="height: 45px;">1</td><td style="height: 45px;">[Feuerwehr-Modus](https://www.youtube.com/watch?v=h7NfY77pWGk)

Denke dir einen „Sondereinsatz“ aus: Wenn ein Ton ertönt (z. B. Sirene), schalten alle Ampeln auf grün, so dass der Sondereinsatzwagen freie Fahrt hat.

</td><td style="height: 45px;"></td></tr><tr style="height: 77px;"><td style="height: 77px;">2</td><td style="height: 77px;">Strom sparen – Ampel nachts ausschalten

  
Erstelle ein Programm, bei dem die Ampel nachts ausgeht oder gelb blinkt.

Idee: Vielleicht mit dem Lichtsensor?

</td><td style="height: 77px;"> </td></tr><tr style="height: 156.234375px;"><td style="height: 156.234375px;">4</td><td style="height: 156.234375px;">Ampel-Kreuzung

Such dir einen Partner. Jeder von euch beiden hat eine eigene Ampel. Eine Ampel ist für die eine Straße, die andere für die Straße, die kreuzt.

Überlegt euch gemeinsam, wie ihr eure Ampeln so schalten könnt, dass es keinen Unfall gibt – also nie beide gleichzeitig grün zeigen. Eure Ampeln sollen sich gut absprechen, damit alles sicher funktioniert!

Ideen:

1. ein Calliope steuert beide Ampel-Leuchtdioden
2. beide Calliopes synchronisieren sich über Funk (siehe [Kommunikation](https://calliope.codingkidz.de/wiki/books/programmieren-mit-dem-calliope-mini/page/kommunikation "Kommunikation"))

</td><td style="height: 156.234375px;"> </td></tr><tr style="height: 45px;"><td style="height: 45px;">4</td><td style="height: 45px;">Drücker für Fußgänger

Programmiere einen Knopf: Wenn man ihn drückt, soll die Ampel auf rot springen, damit die Fussgänger die Kreuzung überqueren können.

</td><td style="height: 45px;"></td></tr></tbody></table>

# Calliope - 6: Der heiße Draht

### Ziel

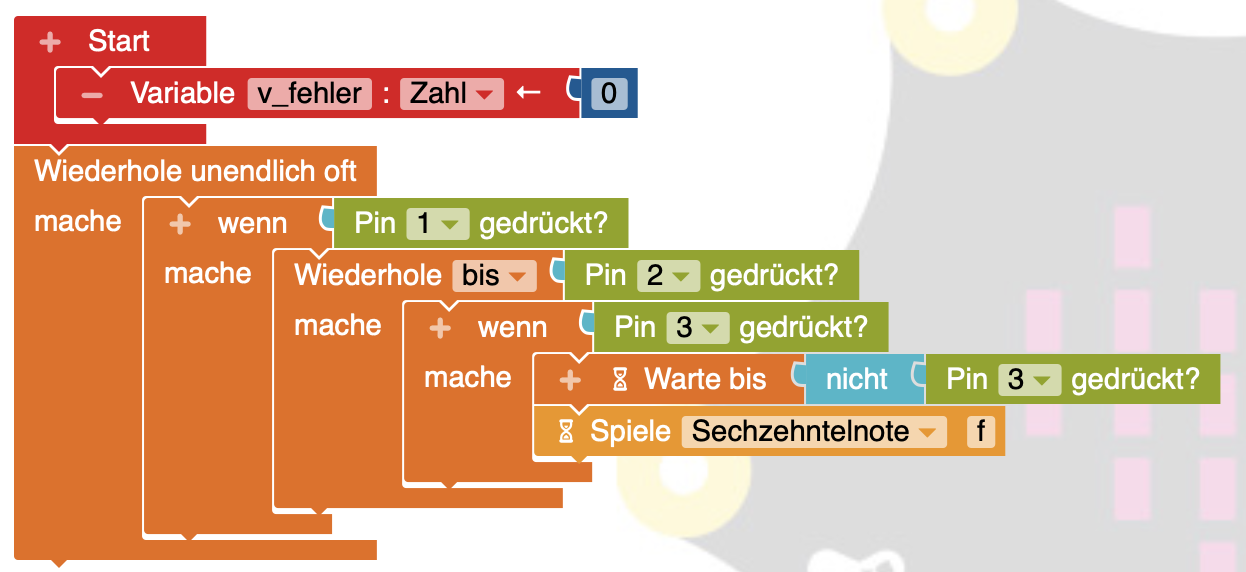
Beim Spiel „Der heiße Draht“ führt der Spieler eine Metallöse entlang eines gebogenen Drahtes. Die Öse umschließt dabei den Draht und muss möglichst ohne Berührung geführt werden. Sobald die Öse den Draht berührt, erkennt der Calliope mini den Kontakt über einen Stromkreis und gibt ein Warnsignal – zum Beispiel mit einem Ton oder rotem Licht.

Das Spiel fordert ruhige Hände und Konzentration. Der Calliope mini übernimmt die Überwachung und zählt z. B. die Berührungen (Taps) oder misst die Zeit. Wer den Draht am geschicktesten ohne Berührung entlangfährt, gewinnt!


### Voraussetzungen / Materialien

<table border="1" id="bkmrk-" style="border-collapse: collapse; width: 100%; height: 58px;"><colgroup><col style="width: 33.571429%;"></col><col style="width: 66.309524%;"></col></colgroup><thead><tr style="height: 29px;"><td style="height: 29px;">  
</td><td style="height: 29px;">  
</td></tr></thead><tbody><tr style="height: 29px;"><td style="height: 29px;">Draht und Gestell

Öse aus Draht in verschiedenen Größen

</td><td style="height: 29px;">  
</td></tr><tr><td>... </td><td>  
</td></tr></tbody></table>

### Aufgaben

<table border="1" id="bkmrk-1-2-3-4" style="border-collapse: collapse; width: 100%;"><colgroup><col style="width: 5.595238%;"></col><col style="width: 31.428571%;"></col><col style="width: 62.857143%;"></col></colgroup><thead><tr><td>Nr</td><td>Beschreibung</td><td>  
</td></tr></thead><tbody><tr><td>1</td><td>  
</td><td>[![Bildschirmfoto 2025-06-18 um 19.17.51.png](https://calliope.codingkidz.de/wiki/uploads/images/gallery/2025-06/scaled-1680-/bildschirmfoto-2025-06-18-um-19-17-51.png)](https://calliope.codingkidz.de/wiki/uploads/images/gallery/2025-06/bildschirmfoto-2025-06-18-um-19-17-51.png)

</td></tr><tr><td>3</td><td>  
</td><td>  
</td></tr><tr><td>4</td><td>  
</td><td>  
</td></tr></tbody></table>

### Experimentierzeit

<table border="1" id="bkmrk-1-2-3-4-1" style="border-collapse: collapse; width: 100%; height: 116px;"><colgroup><col style="width: 5.595238%;"></col><col style="width: 39.166667%;"></col><col style="width: 55.119048%;"></col></colgroup><tbody><tr style="height: 29px;"><td style="height: 29px;">1</td><td style="height: 29px;">  
</td><td style="height: 29px;">  
</td></tr><tr style="height: 29px;"><td style="height: 29px;">2</td><td style="height: 29px;">  
</td><td style="height: 29px;">  
</td></tr><tr style="height: 29px;"><td style="height: 29px;">3</td><td style="height: 29px;">  
</td><td style="height: 29px;">  
</td></tr><tr style="height: 29px;"><td style="height: 29px;">4</td><td style="height: 29px;">  
</td><td style="height: 29px;">  
</td></tr></tbody></table>

### Lösungen

<table border="1" id="bkmrk-1-programm-heisserdr" style="border-collapse: collapse; width: 100%;"><colgroup><col style="width: 5.595238%;"></col><col style="width: 39.166667%;"></col><col style="width: 55.119048%;"></col></colgroup><tbody><tr><td>1</td><td>  
</td><td>Programm [heisserDraht.xml](https://calliope.codingkidz.de/wiki/attachments/157)

Hex (V3.0) [heisserDraht.hex](https://calliope.codingkidz.de/wiki/attachments/158)

Pin 1 = Draht

Pin 2 = Start

Pin 3 = Ende

Pin Minus = Kontaktöse

</td></tr><tr><td>2</td><td>  
</td><td>  
</td></tr><tr><td>3</td><td>  
</td><td>  
</td></tr><tr><td>4</td><td>  
</td><td>  
</td></tr></tbody></table>

# Calli:Bot - 1: Fahren

### Ziel

Wir wollen ein Daumenkino aus Papier basteln. Wir wollen dann den Calliope-mini so programmieren, dass auch er ein Daumenkino abspielt.

### Voraussetzungen / Materialien

<table border="1" id="bkmrk-" style="border-collapse: collapse; width: 100%;"><colgroup><col style="width: 42.857143%;"></col><col style="width: 57.142857%;"></col></colgroup><tbody><tr><td>  
</td><td>  
</td></tr><tr><td>  
</td><td>  
</td></tr></tbody></table>

### Aufgaben

<table border="1" id="bkmrk-1-2-3-4" style="border-collapse: collapse; width: 100%;"><colgroup><col style="width: 5.595238%;"></col><col style="width: 39.166667%;"></col><col style="width: 55.119048%;"></col></colgroup><tbody><tr><td>1</td><td>  
</td><td>  
</td></tr><tr><td>2</td><td>  
</td><td>  
</td></tr><tr><td>3</td><td>  
</td><td>  
</td></tr><tr><td>4</td><td>  
</td><td>  
</td></tr></tbody></table>

### Experimentierzeit

<table border="1" id="bkmrk-1-2-3-4-1" style="border-collapse: collapse; width: 100%;"><colgroup><col style="width: 5.595238%;"></col><col style="width: 39.166667%;"></col><col style="width: 55.119048%;"></col></colgroup><tbody><tr><td>1</td><td>  
</td><td>  
</td></tr><tr><td>2</td><td>  
</td><td>  
</td></tr><tr><td>3</td><td>  
</td><td>  
</td></tr><tr><td>4</td><td>  
</td><td>  
</td></tr></tbody></table>

# Calli:Bot - 2: Ausweichen

### Ziel

Wir wollen ein Daumenkino aus Papier basteln. Wir wollen dann den Calliope-mini so programmieren, dass auch er ein Daumenkino abspielt.

### Voraussetzungen / Materialien

<table border="1" id="bkmrk-" style="border-collapse: collapse; width: 100%;"><colgroup><col style="width: 42.857143%;"></col><col style="width: 57.142857%;"></col></colgroup><tbody><tr><td>  
</td><td>  
</td></tr><tr><td>  
</td><td>  
</td></tr></tbody></table>

### Aufgaben

<table border="1" id="bkmrk-1-2-3-4" style="border-collapse: collapse; width: 100%;"><colgroup><col style="width: 5.595238%;"></col><col style="width: 39.166667%;"></col><col style="width: 55.119048%;"></col></colgroup><tbody><tr><td>1</td><td>  
</td><td>  
</td></tr><tr><td>2</td><td>  
</td><td>  
</td></tr><tr><td>3</td><td>  
</td><td>  
</td></tr><tr><td>4</td><td>  
</td><td>  
</td></tr></tbody></table>

### Experimentierzeit

<table border="1" id="bkmrk-1-2-3-4-1" style="border-collapse: collapse; width: 100%;"><colgroup><col style="width: 5.595238%;"></col><col style="width: 39.166667%;"></col><col style="width: 55.119048%;"></col></colgroup><tbody><tr><td>1</td><td>  
</td><td>  
</td></tr><tr><td>2</td><td>  
</td><td>  
</td></tr><tr><td>3</td><td>  
</td><td>  
</td></tr><tr><td>4</td><td>  
</td><td>  
</td></tr></tbody></table>

# Calli:Bot - 3: Tanzen

### Ziel

Wir wollen ein Daumenkino aus Papier basteln. Wir wollen dann den Calliope-mini so programmieren, dass auch er ein Daumenkino abspielt.

### Voraussetzungen / Materialien

<table border="1" id="bkmrk-" style="border-collapse: collapse; width: 100%;"><colgroup><col style="width: 42.857143%;"></col><col style="width: 57.142857%;"></col></colgroup><tbody><tr><td>  
</td><td>  
</td></tr><tr><td>  
</td><td>  
</td></tr></tbody></table>

### Aufgaben

<table border="1" id="bkmrk-1-2-3-4" style="border-collapse: collapse; width: 100%;"><colgroup><col style="width: 5.595238%;"></col><col style="width: 39.166667%;"></col><col style="width: 55.119048%;"></col></colgroup><tbody><tr><td>1</td><td>  
</td><td>  
</td></tr><tr><td>2</td><td>  
</td><td>  
</td></tr><tr><td>3</td><td>  
</td><td>  
</td></tr><tr><td>4</td><td>  
</td><td>  
</td></tr></tbody></table>

### Experimentierzeit

<table border="1" id="bkmrk-1-2-3-4-1" style="border-collapse: collapse; width: 100%;"><colgroup><col style="width: 5.595238%;"></col><col style="width: 39.166667%;"></col><col style="width: 55.119048%;"></col></colgroup><tbody><tr><td>1</td><td>  
</td><td>  
</td></tr><tr><td>2</td><td>  
</td><td>  
</td></tr><tr><td>3</td><td>  
</td><td>  
</td></tr><tr><td>4</td><td>  
</td><td>  
</td></tr></tbody></table>

# Calli:Bot - 4: Linie folgen - Einzelfahrt

### Ziel

Wir wollen ein Daumenkino aus Papier basteln. Wir wollen dann den Calliope-mini so programmieren, dass auch er ein Daumenkino abspielt.

### Voraussetzungen / Materialien

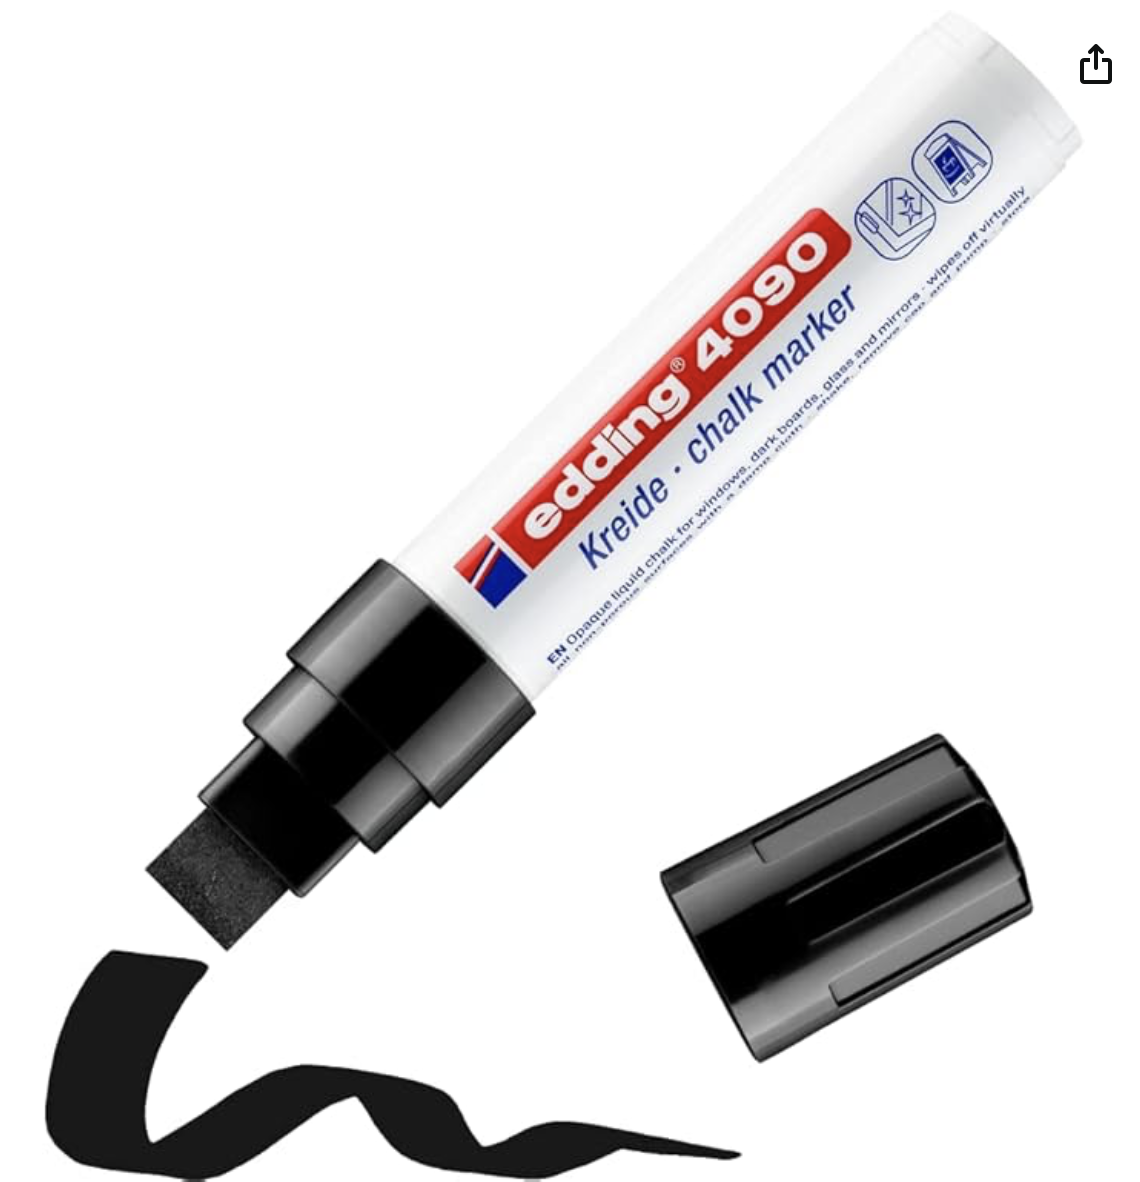
<table border="1" id="bkmrk-" style="border-collapse: collapse; width: 100%;"><colgroup><col style="width: 42.857143%;"></col><col style="width: 57.142857%;"></col></colgroup><tbody><tr><td>Parcours, denen der Calli:Bot folgen kann</td><td>[CalliBots-Parcours\_A1.pdf](https://calliope.codingkidz.de/wiki/attachments/88)</td></tr><tr><td>schwarzer Kreide-Stift, den die Calli:Bot Sensoren erkennen</td><td>[![Bildschirmfoto 2025-06-02 um 07.37.26.png](https://calliope.codingkidz.de/wiki/uploads/images/gallery/2025-06/scaled-1680-/bildschirmfoto-2025-06-02-um-07-37-26.png)](https://calliope.codingkidz.de/wiki/uploads/images/gallery/2025-06/bildschirmfoto-2025-06-02-um-07-37-26.png)

[Link](https://www.amazon.de/dp/B000KT9E94?ref=ppx_yo2ov_dt_b_fed_asin_title)

</td></tr><tr><td>  
</td><td></td></tr></tbody></table>

### Aufgaben

<table border="1" id="bkmrk-1-2-3-4" style="border-collapse: collapse; width: 100%;"><colgroup><col style="width: 5.595238%;"></col><col style="width: 39.166667%;"></col><col style="width: 55.119048%;"></col></colgroup><tbody><tr><td>1</td><td>  
</td><td>  
</td></tr><tr><td>2</td><td>  
</td><td>  
</td></tr><tr><td>3</td><td>  
</td><td>  
</td></tr><tr><td>4</td><td>  
</td><td>  
</td></tr></tbody></table>

### Experimentierzeit

<table border="1" id="bkmrk-1-2-3-4-1" style="border-collapse: collapse; width: 100%; height: 237.03125px;"><colgroup><col style="width: 5.595238%;"></col><col style="width: 38.690476%;"></col><col style="width: 55.595238%;"></col></colgroup><tbody><tr style="height: 118.03125px;"><td style="height: 118.03125px;">1</td><td style="height: 118.03125px;">Erstelle einen eigenen Parcours</td><td style="height: 118.03125px;">Ideen:

- Male mit dem schwarzen Kreide-Stift einen Parcours auf eine Whiteboard und lasse den Calli:Bot darüber fahren.
- Lasse einen Calli:Bot mit dem schwarzen Kreidestift einen Parcours malen und lass einen weiteren Calli:Bot folgen.

</td></tr><tr style="height: 29px;"><td style="height: 29px;">2</td><td style="height: 29px;"> </td><td style="height: 29px;">  
</td></tr><tr style="height: 29px;"><td style="height: 29px;">3</td><td style="height: 29px;">  
</td><td style="height: 29px;">  
</td></tr><tr style="height: 61px;"><td style="height: 61px;">4</td><td style="height: 61px;">Idee:

Parcours mit Powerpoint erstellen und dann ausdrucken

</td><td style="height: 61px;">[Linefollower - Parcours entwerfen](https://calliope.codingkidz.de/wiki/books/programmieren-mit-dem-calliope-mini/page/linefollower-parcours-entwerfen "Linefollower - Parcours entwerfen")</td></tr></tbody></table>

# Calli:Bot - 5: Linie folgen - Gruppenfahrt

### Ziel

Wir wollen ein Daumenkino aus Papier basteln. Wir wollen dann den Calliope-mini so programmieren, dass auch er ein Daumenkino abspielt.

### Voraussetzungen / Materialien

<table border="1" id="bkmrk-" style="border-collapse: collapse; width: 100%;"><colgroup><col style="width: 42.857143%;"></col><col style="width: 57.142857%;"></col></colgroup><tbody><tr><td>Linien-Parcoure</td><td>[CalliBots-Parcours\_A1.pdf](https://calliope.codingkidz.de/wiki/attachments/88)</td></tr><tr><td>Linefollower-Strassen</td><td></td></tr></tbody></table>

### Aufgaben

<table border="1" id="bkmrk-1-2-3-4" style="border-collapse: collapse; width: 100%;"><colgroup><col style="width: 5.595238%;"></col><col style="width: 39.166667%;"></col><col style="width: 55.119048%;"></col></colgroup><tbody><tr><td>1</td><td>  
</td><td>  
</td></tr><tr><td>2</td><td>  
</td><td>  
</td></tr><tr><td>3</td><td>  
</td><td>  
</td></tr><tr><td>4</td><td>  
</td><td>  
</td></tr></tbody></table>

### Experimentierzeit

<table border="1" id="bkmrk-1-2-3-4-1" style="border-collapse: collapse; width: 100%; height: 117.03125px;"><colgroup><col style="width: 5.595238%;"></col><col style="width: 38.690476%;"></col><col style="width: 55.595238%;"></col></colgroup><tbody><tr style="height: 30.03125px;"><td style="height: 30.03125px;">1</td><td style="height: 30.03125px;"> </td><td style="height: 30.03125px;"> </td></tr><tr style="height: 29px;"><td style="height: 29px;">2</td><td style="height: 29px;"> </td><td style="height: 29px;">  
</td></tr><tr style="height: 29px;"><td style="height: 29px;">3</td><td style="height: 29px;">  
</td><td style="height: 29px;">  
</td></tr><tr style="height: 29px;"><td>4</td><td>Idee:

Parcours mit Powerpoint erstellen und dann ausdrucken

</td><td>[Linefollower - Parcours entwerfen](https://calliope.codingkidz.de/wiki/books/programmieren-mit-dem-calliope-mini/page/linefollower-parcours-entwerfen "Linefollower - Parcours entwerfen")</td></tr></tbody></table>

# Calli:Bot - 6: Fernbedienung

### Ziel

Wir wollen ein Daumenkino aus Papier basteln. Wir wollen dann den Calliope-mini so programmieren, dass auch er ein Daumenkino abspielt.

### Voraussetzungen / Materialien

<table border="1" id="bkmrk-" style="border-collapse: collapse; width: 100%;"><colgroup><col style="width: 42.857143%;"></col><col style="width: 57.142857%;"></col></colgroup><tbody><tr><td>  
</td><td>  
</td></tr><tr><td>  
</td><td>  
</td></tr></tbody></table>

### Aufgaben

<table border="1" id="bkmrk-1-2-3-4" style="border-collapse: collapse; width: 100%;"><colgroup><col style="width: 5.595238%;"></col><col style="width: 39.166667%;"></col><col style="width: 55.119048%;"></col></colgroup><tbody><tr><td>1</td><td>  
</td><td>  
</td></tr><tr><td>2</td><td>  
</td><td>  
</td></tr><tr><td>3</td><td>  
</td><td>  
</td></tr><tr><td>4</td><td>  
</td><td>  
</td></tr></tbody></table>

### Experimentierzeit

<table border="1" id="bkmrk-1-2-3-4-1" style="border-collapse: collapse; width: 100%;"><colgroup><col style="width: 5.595238%;"></col><col style="width: 39.166667%;"></col><col style="width: 55.119048%;"></col></colgroup><tbody><tr><td>1</td><td>  
</td><td>  
</td></tr><tr><td>2</td><td>  
</td><td>  
</td></tr><tr><td>3</td><td>  
</td><td>  
</td></tr><tr><td>4</td><td>  
</td><td>  
</td></tr></tbody></table>

# Calli:Bot - 7: Flashmob

### Ziel

Wir wollen ein Daumenkino aus Papier basteln. Wir wollen dann den Calliope-mini so programmieren, dass auch er ein Daumenkino abspielt.

### Voraussetzungen / Materialien

<table border="1" id="bkmrk-" style="border-collapse: collapse; width: 100%;"><colgroup><col style="width: 42.857143%;"></col><col style="width: 57.142857%;"></col></colgroup><tbody><tr><td>  
</td><td>  
</td></tr><tr><td>  
</td><td>  
</td></tr></tbody></table>

### Aufgaben

<table border="1" id="bkmrk-1-2-3-4" style="border-collapse: collapse; width: 100%;"><colgroup><col style="width: 5.595238%;"></col><col style="width: 39.166667%;"></col><col style="width: 55.119048%;"></col></colgroup><tbody><tr><td>1</td><td>  
</td><td>  
</td></tr><tr><td>2</td><td>  
</td><td>  
</td></tr><tr><td>3</td><td>  
</td><td>  
</td></tr><tr><td>4</td><td>  
</td><td>  
</td></tr></tbody></table>

### Experimentierzeit

<table border="1" id="bkmrk-1-2-3-4-1" style="border-collapse: collapse; width: 100%;"><colgroup><col style="width: 5.595238%;"></col><col style="width: 39.166667%;"></col><col style="width: 55.119048%;"></col></colgroup><tbody><tr><td>1</td><td>  
</td><td>  
</td></tr><tr><td>2</td><td>  
</td><td>  
</td></tr><tr><td>3</td><td>  
</td><td>  
</td></tr><tr><td>4</td><td>  
</td><td>  
</td></tr></tbody></table>

# Kurs - Mitmach-Stationen

Ein besonderes Highlight des Coding-Kurses ist die Präsentation der Projekte im Rahmen von Schulveranstaltungen wie dem Sommerfest. An der **Kurs-Mitmach-Station** haben die Schülerinnen und Schüler die Gelegenheit, ihre Arbeit selbstbewusst vorzustellen, anderen ihr Wissen zu erklären und die erlebbaren Ergebnisse aus dem Kurs live zu demonstrieren – etwa tanzende Roboter, blinkende Lichter oder selbstgebaute Linienparcours.

Diese Mitmach-Station macht nicht nur die Lernfortschritte sichtbar, sondern schafft einen Raum für Austausch, Staunen und Ausprobieren. Kinder, Eltern und Besucher können selbst Hand anlegen, Callibots steuern oder einfache Programme testen – ganz im Sinne eines offenen, lebendigen Lernens.

# Organisation

### Events

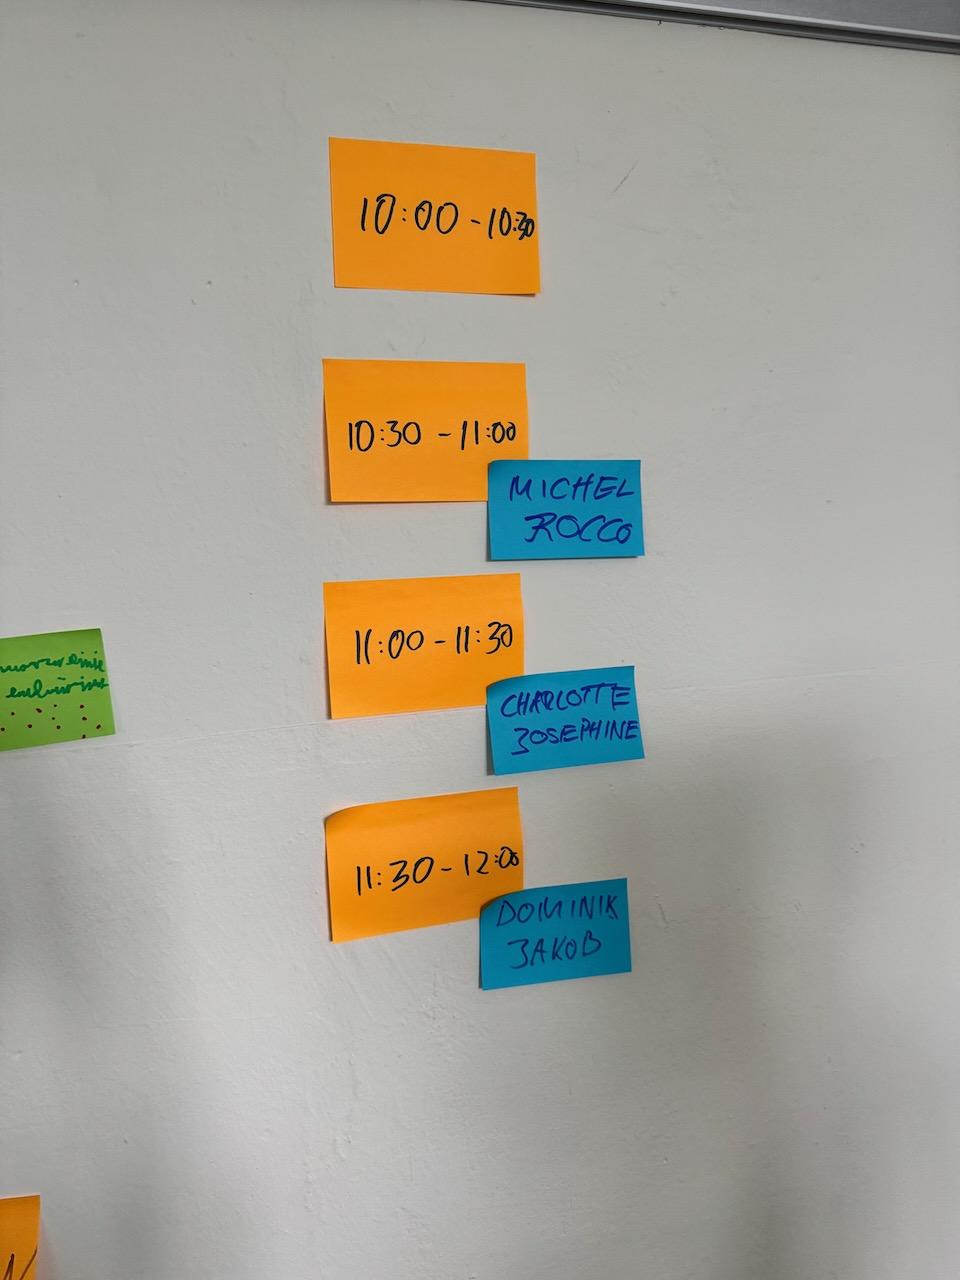
<table border="1" id="bkmrk-sommerfest-2025-somm" style="border-collapse: collapse; width: 100%;"><colgroup><col style="width: 31.071429%;"></col><col style="width: 68.928571%;"></col></colgroup><tbody><tr><td>Sommerfest 2025</td><td>Standdienst:

[![IMG_7652.jpeg](https://calliope.codingkidz.de/wiki/uploads/images/gallery/2025-06/scaled-1680-/HItimg-7652.jpeg)](https://calliope.codingkidz.de/wiki/uploads/images/gallery/2025-06/HItimg-7652.jpeg)

</td></tr><tr><td>Sommerfest 2019</td><td>  
</td></tr></tbody></table>

# Bürstenroboter

### Idee

### Vorüberlegungen

### Umsetzung 

<table border="1" id="bkmrk-anleitung-bauplan_da" style="border-collapse: collapse; width: 100%;"><colgroup><col style="width: 40%;"></col><col style="width: 60%;"></col></colgroup><tbody><tr><td>Anleitung</td><td> </td></tr><tr><td>Vorlagen</td><td>[Bauplan\_Bürstenroboter.pdf](https://calliope.codingkidz.de/wiki/attachments/91)

[Bauplan\_Bürstenroboter.docx](https://calliope.codingkidz.de/wiki/attachments/92)

</td></tr><tr><td>Materialien</td><td>  
</td></tr></tbody></table>

### Programm

# Evli - Sommerfest

### Materialien

<table border="1" id="bkmrk-tische-st%C3%BChle-whiteb" style="border-collapse: collapse; width: 100%; height: 161px;"><colgroup><col style="width: 50%;"></col><col style="width: 50%;"></col></colgroup><thead><tr style="height: 29px;"><td style="height: 29px;">Name</td><td style="height: 29px;">Bemerkung</td></tr></thead><tbody><tr style="height: 45px;"><td style="height: 45px;">4 Tische</td><td style="height: 45px;">Strom oder Lademöglichkeit für Computer</td></tr><tr style="height: 29px;"><td style="height: 29px;">4 Stühle</td><td style="height: 29px;">Schul-Internet oder Hotspot</td></tr><tr style="height: 29px;"><td style="height: 29px;">2 Whiteboards</td><td style="height: 29px;">  
</td></tr><tr style="height: 29px;"><td style="height: 29px;">2 Computer</td><td style="height: 29px;">  
</td></tr><tr><td>Aufstellen für Exponate </td><td> Calliope Aufsteller:

- [Aufsteller\_Mathematik.docx](https://calliope.codingkidz.de/wiki/attachments/140)
- [Aufsteller\_FangDenMaulwurf.docx](https://calliope.codingkidz.de/wiki/attachments/141)
- [Aufsteller\_Exponate.docx](https://calliope.codingkidz.de/wiki/attachments/142)
- [Aufsteller\_Erläuterung\_heißer\_Draht.docx](https://calliope.codingkidz.de/wiki/attachments/143)
- [Aufsteller\_Schere\_Stein\_Papier.docx](https://calliope.codingkidz.de/wiki/attachments/144)

<span style="color: rgb(0, 0, 0);">Calli:Bot Aufsteller</span>

- <span style="color: rgb(0, 0, 0);">[Aufsteller\_LabyrinthCallibot.docx](https://calliope.codingkidz.de/wiki/attachments/149)</span>
- <span style="color: rgb(0, 0, 0);">[Aufsteller\_MalenCallibot.docx](https://calliope.codingkidz.de/wiki/attachments/150)</span>
- <span style="color: rgb(0, 0, 0);">[Aufsteller\_CallibotTanzen.docx](https://calliope.codingkidz.de/wiki/attachments/151)</span>
- <span style="color: rgb(0, 0, 0);">[Aufsteller\_FussballCallibot.docx](https://calliope.codingkidz.de/wiki/attachments/152)</span>
- <span style="color: rgb(0, 0, 0);">[Aufsteller\_ÜberholenCallibot.docx](https://calliope.codingkidz.de/wiki/attachments/153)</span>
- <span style="color: rgb(0, 0, 0);">[Aufsteller\_FangDenCallibot.docx](https://calliope.codingkidz.de/wiki/attachments/154)</span>

</td></tr></tbody></table>

### Calliope - Exponate

<table border="1" id="bkmrk-calli%3Abot-fussball%C2%A0-" style="border-collapse: collapse; width: 100%; height: 1611.9375px;"><colgroup><col style="width: 23.333333%;"></col><col style="width: 14.761905%;"></col><col style="width: 29.642857%;"></col><col style="width: 32.142857%;"></col></colgroup><thead><tr style="height: 29px;"><td style="height: 29px;">Name</td><td style="height: 29px;">Calliope</td><td style="height: 29px;">Material</td><td style="height: 29px;">  
</td></tr></thead><tbody><tr style="height: 52.4375px;"><td style="height: 52.4375px;">Smiley</td><td style="height: 52.4375px;">Callibot 10</td><td style="height: 52.4375px;">- [x] Programm

</td><td style="height: 52.4375px;">[Calliope - 1: Smiley](https://calliope.codingkidz.de/wiki/books/calliope-mini-programmieren-kurs/page/calliope-1-smiley "Calliope - 1: Smiley")

- [Smiley.xml](https://calliope.codingkidz.de/wiki/attachments/133)
- [Smiley.hex](https://calliope.codingkidz.de/wiki/attachments/134)

</td></tr><tr style="height: 52.4375px;"><td style="height: 52.4375px;">  
</td><td style="height: 52.4375px;">  
</td><td style="height: 52.4375px;">- [x] Code-Ausdruck

[![image.png](https://calliope.codingkidz.de/wiki/uploads/images/gallery/2025-06/scaled-1680-/erbimage.png)](https://calliope.codingkidz.de/wiki/uploads/images/gallery/2025-06/erbimage.png)

</td><td style="height: 52.4375px;">- [SmileyCode.docx](https://calliope.codingkidz.de/wiki/attachments/135)

</td></tr><tr style="height: 29px;"><td style="height: 29px;">  
</td><td style="height: 29px;">  
</td></tr><tr style="height: 146.4375px;"><td style="height: 146.4375px;">Papier/Stein/Schere</td><td style="height: 146.4375px;">1, 3 </td><td style="height: 146.4375px;">- [x] Programm

</td><td style="height: 146.4375px;">[Calliope - 2: Zufallsspiele](https://calliope.codingkidz.de/wiki/books/calliope-mini-programmieren-kurs/page/calliope-2-zufallsspiele "Calliope - 2: Zufallsspiele")

- [SchereSteinPapier\_cheating.xml](https://calliope.codingkidz.de/wiki/attachments/125)
- [SchereSteinPapier\_cheating\_Kanal17.hex](https://calliope.codingkidz.de/wiki/attachments/126)

</td></tr><tr style="height: 402.4375px;"><td style="height: 402.4375px;">  
</td><td style="height: 402.4375px;">  
</td><td style="height: 402.4375px;">- [x] Code-Ausdruck

[![Bildschirmfoto 2025-06-09 um 23.47.37.png](https://calliope.codingkidz.de/wiki/uploads/images/gallery/2025-06/scaled-1680-/bildschirmfoto-2025-06-09-um-23-47-37.png)](https://calliope.codingkidz.de/wiki/uploads/images/gallery/2025-06/bildschirmfoto-2025-06-09-um-23-47-37.png)

</td><td style="height: 402.4375px;">- [SchereSteinPapier.xml](https://calliope.codingkidz.de/wiki/attachments/127)
- [SchereSteinPapierCode.docx](https://calliope.codingkidz.de/wiki/attachments/128)

</td></tr><tr style="height: 29px;"><td style="height: 29px;">  
</td><td style="height: 29px;">  
</td></tr><tr style="height: 58.4375px;"><td style="height: 58.4375px;">Würfel</td><td style="height: 58.4375px;">9</td><td style="height: 58.4375px;">- [x] Programm

</td><td style="height: 58.4375px;">- [Würfel\_beep.hex](https://calliope.codingkidz.de/wiki/attachments/129)

</td></tr><tr style="height: 536.4375px;"><td style="height: 536.4375px;">  
</td><td style="height: 536.4375px;">  
</td><td style="height: 536.4375px;">- [x] Code-Ausdruck

[![Bildschirmfoto 2025-06-10 um 00.10.03.png](https://calliope.codingkidz.de/wiki/uploads/images/gallery/2025-06/scaled-1680-/bildschirmfoto-2025-06-10-um-00-10-03.png)](https://calliope.codingkidz.de/wiki/uploads/images/gallery/2025-06/bildschirmfoto-2025-06-10-um-00-10-03.png)

[![image.png](https://calliope.codingkidz.de/wiki/uploads/images/gallery/2025-06/scaled-1680-/Z9Oimage.png)](https://calliope.codingkidz.de/wiki/uploads/images/gallery/2025-06/Z9Oimage.png)
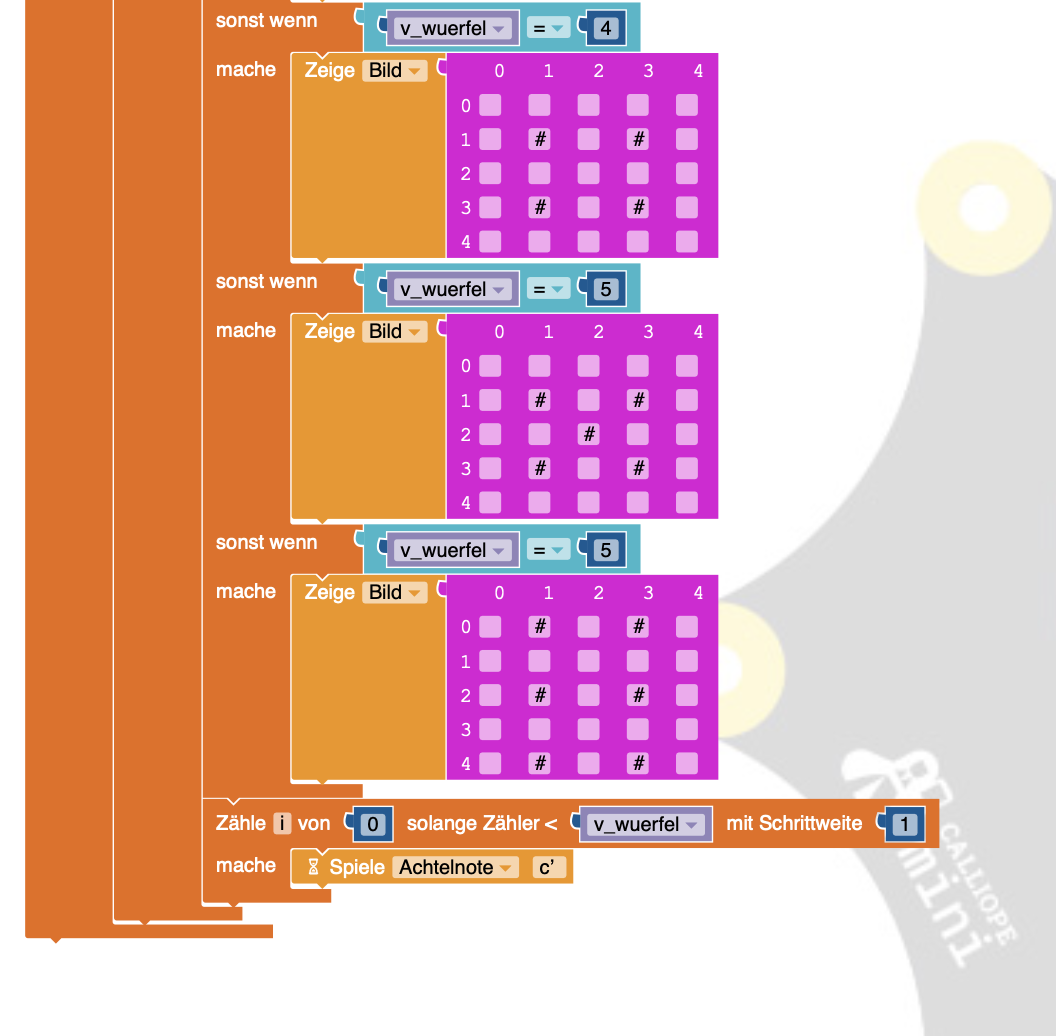
</td><td style="height: 536.4375px;">- [Würfel.xml](https://calliope.codingkidz.de/wiki/attachments/131)
- [WürfelBeepCode.docx](https://calliope.codingkidz.de/wiki/attachments/132)

</td></tr><tr style="height: 29px;"><td style="height: 29px;">  
</td><td style="height: 29px;">  
</td></tr><tr style="height: 52.4375px;"><td style="height: 52.4375px;">Fang den Maulwurf</td><td style="height: 52.4375px;">8, 11</td><td style="height: 52.4375px;">- [x] Programm

</td><td style="height: 52.4375px;">[Fange\_Maulwurf.hex](https://calliope.codingkidz.de/wiki/attachments/124)</td></tr><tr style="height: 29px;"><td style="height: 29px;">  
</td><td style="height: 29px;">  
</td></tr><tr style="height: 84.4375px;"><td style="height: 84.4375px;">Heiße Draht</td><td style="height: 84.4375px;">neu Calliope V3</td><td style="height: 84.4375px;">- [ ] <span style="color: rgb(0, 0, 0);">Drahtgeflecht</span>
- [ ] <span style="color: rgb(0, 0, 0);">Aufsteller</span>
- [ ] <span style="color: rgb(0, 0, 0);">Krokodil-Klemmen</span>

</td><td style="height: 84.4375px;">  
</td></tr><tr style="height: 52.4375px;"><td style="height: 52.4375px;">  
</td><td style="height: 52.4375px;">  
</td><td style="height: 52.4375px;">- [x] <span style="color: rgb(0, 0, 0);">Programm</span>

</td><td style="height: 52.4375px;">[heisserDraht.xml](https://calliope.codingkidz.de/wiki/attachments/155)

[heisserDraht.hex](https://calliope.codingkidz.de/wiki/attachments/156)

</td></tr></tbody></table>

### Calli:Bot - Exponate

<table border="1" id="bkmrk-calli%3Abot-fussball%C2%A0--1" style="border-collapse: collapse; width: 100%; height: 1127.265625px;"><colgroup><col style="width: 20%;"></col><col style="width: 8.571429%;"></col><col style="width: 6.190476%;"></col><col style="width: 23.809524%;"></col><col style="width: 41.309524%;"></col><col style="width: 0.00372%;"></col></colgroup><thead><tr style="height: 45px;"><td style="height: 45px;">Name</td><td style="height: 45px;">Calliope</td><td style="height: 45px;">Bot</td><td style="height: 45px;">Material</td><td style="height: 45px;">Bemerkungen</td><td style="height: 45px;">  
</td></tr></thead><tbody><tr style="height: 118.828125px;"><td style="height: 118.828125px;">Calli:Bot mit Fernbedienung fahren

- Fussball
- Malen
- Labyrinth

</td><td style="height: 118.828125px;">5, 12</td><td style="height: 118.828125px;">2,4 </td><td style="height: 118.828125px;">- [x] Programm

<span style="color: rgb(45, 194, 107);">**Kanal 5, 12**</span>

</td><td style="height: 118.828125px;">- [Callibot\_Fernbedienung\_Fussball.xml](https://calliope.codingkidz.de/wiki/attachments/116)
- [Callibot\_Fernbedienung\_Fussball\_Kanal5.hex](https://calliope.codingkidz.de/wiki/attachments/115)
- [Callibot\_Fernbedienung\_Fussball\_Kanal12.hex](https://calliope.codingkidz.de/wiki/attachments/114)

</td><td style="height: 118.828125px;"> </td></tr><tr style="height: 70.03125px;"><td style="height: 70.03125px;">  
</td><td style="height: 70.03125px;">  
</td><td style="height: 70.03125px;">- [x] Spielfeld
- [ ] <span style="color: rgb(224, 62, 45);">Umrandung</span>

</td><td style="height: 70.03125px;">- Spielfeld = Whiteboard
- <span style="color: rgb(224, 62, 45);">Umrandung ggf. aus Pappe </span>

</td><td style="height: 70.03125px;">  
</td></tr><tr style="height: 132.4375px;"><td style="height: 132.4375px;">  
</td><td style="height: 132.4375px;">  
</td><td style="height: 132.4375px;">Fussball:

- [x] Schläger
- [x] Golfball mit Stopper
- [x] Tore (Stifthalter + Stifte)

</td><td style="height: 132.4375px;">  
</td></tr><tr style="height: 84.4375px;"><td style="height: 84.4375px;"> </td><td style="height: 84.4375px;"> </td><td style="height: 84.4375px;"> </td><td style="height: 84.4375px;">Malen:

- [x] Stifthalter
- [x] Stifte

</td><td style="height: 84.4375px;"><span style="color: rgb(0, 0, 0);">2 Extra Calli:Bots mit Software bespielen</span></td><td style="height: 84.4375px;">  
</td></tr><tr style="height: 68.4375px;"><td style="height: 68.4375px;"> </td><td style="height: 68.4375px;">  
</td><td style="height: 68.4375px;">  
</td><td style="height: 68.4375px;">Labyrinth:

- [ ] <span style="color: rgb(224, 62, 45);">Begrenzungen </span>

</td><td style="height: 68.4375px;">- <span style="color: rgb(224, 62, 45);">Labyrinth ggf. aus Pappe </span>

</td><td style="height: 68.4375px;">  
</td></tr><tr style="height: 44px;"><td style="height: 44px;">  
</td><td style="height: 44px;">  
</td></tr><tr style="height: 57px;"><td style="height: 57px;">Calli:Bot Tanzen</td><td style="height: 57px;">  
</td><td style="height: 57px;">1,3</td><td style="height: 57px;">- [x] Programm

</td><td style="height: 57px;">- [Callibot\_tanzen.xml](https://calliope.codingkidz.de/wiki/attachments/117)
- [Callibot\_tanzen.hex](https://calliope.codingkidz.de/wiki/attachments/118)

</td><td style="height: 57px;">  
</td></tr><tr style="height: 53.234375px;"><td style="height: 53.234375px;">  
</td><td style="height: 53.234375px;">  
</td><td style="height: 53.234375px;">- [x] Bluetooth-Box

</td><td style="height: 53.234375px;">- Box von Christian

</td><td style="height: 53.234375px;">  
</td></tr><tr style="height: 44px;"><td style="height: 44px;">  
</td><td style="height: 44px;">  
</td></tr><tr style="height: 52.4375px;"><td style="height: 52.4375px;">Calli:Bot Linefollower</td><td style="height: 52.4375px;">  
</td><td style="height: 52.4375px;">6,7</td><td style="height: 52.4375px;">- [x] Programm

</td><td style="height: 52.4375px;">[Calli:Bot - 5: Linie folgen - Gruppenfahrt](https://calliope.codingkidz.de/wiki/books/calliope-mini-programmieren-kurs/page/callibot-5-linie-folgen-gruppenfahrt "Calli:Bot - 5: Linie folgen - Gruppenfahrt")

- [Linefollower\_mit\_Überholen.xml](https://calliope.codingkidz.de/wiki/attachments/147)
- [Linefollower\_mit\_Überholen.hex](https://calliope.codingkidz.de/wiki/attachments/148)

</td><td style="height: 52.4375px;">  
</td></tr><tr style="height: 136.421875px;"><td style="height: 136.421875px;">  
</td><td style="height: 136.421875px;">  
</td><td style="height: 136.421875px;">- [x] Parcoure

</td><td style="height: 136.421875px;">[neue A0 Plots](https://calliope.codingkidz.de/wiki/books/programmieren-mit-dem-calliope-mini/page/linefollower-parcours-entwerfen "Linefollower - Parcours entwerfen"):

- Donut
- Wabe
- Kreise
- Spinnennetz
- Labyrinth

</td><td style="height: 136.421875px;">  
</td></tr><tr style="height: 44px;"><td style="height: 44px;">  
</td><td style="height: 44px;">  
</td></tr><tr style="height: 45px;"><td style="height: 45px;">Calli:Bot Linefollower

Fang den Calli:Bot

</td><td style="height: 45px;">10</td><td style="height: 45px;">8, 12</td><td style="height: 45px;">- [x] Programm

<span style="color: rgb(45, 194, 107);">**Kanal 10**</span>

</td><td style="height: 45px;">[Linefollower - Fang den Calli:Bot !](https://calliope.codingkidz.de/wiki/books/programmieren-mit-dem-calliope-mini/page/linefollower-fang-den-callibot "Linefollower - Fang den Calli:Bot !")

- [Callibot\_Linefollower\_Fange.xml](https://calliope.codingkidz.de/wiki/attachments/119)
- [Callibot\_Linefollower\_Fange.hex](https://calliope.codingkidz.de/wiki/attachments/120)

</td><td style="height: 45px;">  
</td></tr><tr style="height: 44px;"><td style="height: 44px;">  
</td><td style="height: 44px;">  
</td><td style="height: 44px;">- [x] Parcoure

</td><td style="height: 44px;">[neue A0 Plots](https://calliope.codingkidz.de/wiki/books/programmieren-mit-dem-calliope-mini/page/linefollower-parcours-entwerfen "Linefollower - Parcours entwerfen"):

- Spinnennetz
- Labyrinth

</td><td style="height: 44px;">  
</td></tr></tbody></table>

# Kurs - Fragen & Antworten

### **Programmierkurs**

<table id="bkmrk-nr-frage-antwort-1-w" style="border-collapse:collapse;width:100%;height:437px;"><colgroup><col style="width:7.142857%;"></col><col style="width:27.02381%;"></col><col style="width:65.714286%;"></col></colgroup><thead><tr><td>**Nr**</td><td>**Frage**</td><td>**Antwort**

</td></tr></thead><tbody><tr style="height:77px;"><td style="height:77px;">1</td><td style="height:77px;">Was ist der Calliope Mini und warum nutzen wir ihn im Kurs?</td><td style="height:77px;">Der Calliope Mini ist ein kleiner Mikrocontroller, der speziell für den Einstieg ins Programmieren entwickelt wurde. Kinder können damit erste Programme schreiben, Sensoren nutzen und sogar Roboter steuern.

👉 *Mehr dazu im Kapitel:*

</td></tr><tr style="height:61px;"><td style="height:61px;">2</td><td style="height:61px;">Welche Voraussetzungen brauchen Kinder für den Kurs?</td><td style="height:61px;">Keine! Der Kurs ist so aufgebaut, dass alle Kinder ab Klasse 4 ohne Vorkenntnisse mitmachen können. Es werden alle Grundlagen Schritt für Schritt erklärt.

👉 *Mehr dazu im Kapitel:*

</td></tr><tr style="height:77px;"><td style="height:77px;">3</td><td style="height:77px;">Welche Hardware wird im Kurs verwendet?</td><td style="height:77px;">Die Kinder programmieren mit der grafischen Programmiersprache NEPO im Open Roberta Lab. Dabei werden Programmierblöcke wie in einem Puzzle zusammengesetzt.  
👉 *Mehr dazu im Kapitel:*

</td></tr><tr style="height:77px;"><td style="height:77px;">4</td><td style="height:77px;">Wie funktioniert die Programmierung?</td><td style="height:77px;">Die Kinder programmieren mit der grafischen Programmiersprache NEPO im Open Roberta Lab. Dabei werden Programmierblöcke wie in einem Puzzle zusammengesetzt.  
👉 *Mehr dazu im Kapitel:*

</td></tr><tr style="height:29px;"><td style="height:29px;">5</td><td style="height:29px;">Was machen die Kinder im Kurs konkret?</td><td style="height:29px;">Die Kinder programmieren LEDs, Sensoren, kleine Spiele und steuern den Callibot durch Linienparcours oder in eigenen Projekten.  
👉 *Mehr dazu in den Kapiteln:*

</td></tr><tr style="height:29px;"><td style="height:29px;">6</td><td style="height:29px;">Kann ich als Elternteil oder Lehrkraft den Kurs begleiten?</td><td style="height:29px;">Ja, der Kurs ist so aufgebaut, dass auch Erwachsene ohne Vorkenntnisse mitlernen und unterstützen können.  
👉 *Mehr dazu im Kapitel:*

</td></tr><tr style="height:29px;"><td style="height:29px;">7</td><td style="height:29px;">Was passiert, wenn etwas nicht funktioniert (z. B. Verbindung zum Roboter)?</td><td style="height:29px;">Typische Fehlerquellen werden im Buch beschrieben – von Verbindungsproblemen bis zu Programmierfehlern.  
👉 *Mehr dazu im Kapitel:*

</td></tr><tr style="height:29px;"><td style="height:29px;">8</td><td style="height:29px;">Gibt es am Ende des Kurses eine Präsentation oder ein Ergebnis?</td><td style="height:29px;">Ja! Die Kinder zeigen ihre Projekte z. B. bei Schulveranstaltungen an einer Mitmach-Station.  
👉 *Mehr dazu im Kapitel:*

</td></tr><tr style="height:29px;"><td style="height:29px;">9</td><td style="height:29px;">... </td><td style="height:29px;"></td></tr></tbody></table>